Tag Archives: lunch

Fingerling Potato and Tuna Salad

12 Jun

Dinner! Or lunch! Or a snack! This works for everything.

I found this recipe on Serious Eats and immediately bookmarked it because it is made almost entirely of ingredients that are lurking somewhere in the depths of my very messy fridge or cabinets.  I don’t usually eat canned tuna, but after this I was reminded how versatile and tasty it is- I got the good-quality stuff packed in olive oil, but I’m sure regular old canned tuna would work just fine.  This isn’t a recipe for you if you don’t like quite strong flavors, as it includes red onions, capers, and the tuna, but since the potatoes make up the bulk of the salad the other ingredients aren’t too overwhelming, and all complement each other nicely.  This was delicious as a dinner served warm, and every bit as good straight out of the fridge the next day.  I simplified this a bit from the original, which called for multiple bowls and carrots and onions pretty pointlessly boiling with the potatoes to flavor them.  I’m making this salad again right now for lunch this week, and added some asparagus that I bought today to the mix to spice things up a bit and make it even more summery.

Fingerling Potato and Tuna Salad
Adapted from Serious Eats
Serves 2-3 (The original says 4, so apparently I eat twice as much as they anticipated.)

Equipment: Saucepan, bowl, knife
Ingredients:
1 bay leaf (optional)
1 pound fingerling potatoes, scrubbed
1/2 cup olive oil
4 tablespoons red wine vinegar
1 can tuna in olive oil
2 tablespoons chopped capers
1/2 red onion, finely diced
1/4 cup chopped parsley
Small handful arugula
1/2 bunch asparagus, chopped (optional)
Salt and pepper to taste

Put potatoes in a large pot of salted water and bring to a boil with a bay leaf if you have one.  Boil until tender, then drain and slice.  Toss with olive oil and vinegar in a large bowl.  Drain tuna and add to the bowl, along with the chopped onion, capers, asparagus, and parsley. Season to taste with salt, pepper, and more olive oil or vinegar if needed.  Add the arugula and toss together.  Serve warm or keep in the fridge and serve cold.


Cous Cous Salad and Simple Vinaigrette

30 Mar
Not wah cous cous, yum cous cous!

Cous cous always brings me back to my boarding school days, where we had a kitchen with a fridge, microwave, and kettle, but no hob (I actually don’t remember the American word for a hob- burner/burner ring perhaps?).  Since we had a kettle you could boil water and prepare pasta in the microwave, or, more easily, cous cous.  Cous cous and pesto was a very popular boarding school staple, and I still always buy it when I’m stocking up my kitchen since it’s a great accompaniment to meat or fish dishes, and also pretty filling on its own.  The other night I made a whole package of pre-seasoned cous cous to go with my teriyaki chicken tenders, and then used the cold leftovers to toss with some vegetables and reuse as a lunch salad.  I put some cherry tomatoes, avocado, and spinach in with the cold cous cous, then topped it all with my favorite simple vinaigrette.  Other than the possibility of the spinach/lettuce wilting a little if you over-dress this, it keeps very well in the fridge for a few days, so make a big batch and use it as a side dish or lunch all week!

The vinaigrette is what I always have in a glass beaker in the kitchen for whenever I get the urge to have a salad with whatever else I’m eating (last week I actually put a salad on a pizza. I know this defeats the purpose of a salad, but it was delish.)  I can’t really provide specific measurements, but will give an estimate below, and make sure to taste it and add some more oil, vinegar, etc, until it is right for you.  Then pour over salads, halved avocados, cous cous, whatever you want!  Oh and, a note on the cous cous.  Be careful when you open the package, those beads will get everywhere if they are spilled. Wah cous cous.

Cous Cous Salad
Serves 4 as side dish or lunch

Ingredients:
1 package Near East Cous Cous (the varieties with garlic/herb seasoning are good), or other cous cous with about 4 servings, cooked and cooled
1/2 pint cherry tomatoes, halved
1 avocado, diced
3 oz baby spinach
2-3 tablespoons balsamic vinaigrette, recipe follows

Place cous cous, cherry tomatoes, and avocado in a large bowl and toss together, breaking up any large lumps of cous cous. Add the spinach drizzle with vinaigrette, then toss everything together again.  Taste and add more vinaigrette if needed.


Simple Balsamic Vinaigrette

Ingredients:
6 tablespoons extra-virgin olive oil
2-3 tablespoons balsamic vinegar
1 clove garlic, put through a garlic press or very finely minced
1 tablespoon lemon or orange juice
Salt and pepper

Put all ingredients in a mason jar or glass beaker and shake well.  Taste and adjust according to your own preference.

Restaurant Review: Brunch at Peacock Cafe

27 Mar

Eggs Benedict- the perfect Sunday morning meal

I know brunch isn’t a meal that one has every day, but it holds a special place in my heart, especially when the weather is warm and you are allowed to sit outside for hours drinking iced coffee and eating eggs and pancakes and bacon.  Despite the fact that it is supposed to snow today, we did have a brief glimpse of spring in DC last week, and Gina and I took advantage of the sunshine to get an outdoor brunch at Peacock Cafe in Georgetown.  I’ve been going to Peacock with friends for ages, and have many fond memories of Sunday brunches spent re-hashing the last night’s dramas over mimosas and poached eggs.  They do pretty delicious lunch and dinner things as well (the Caesar salad is one of the best I’ve had, and make sure you get a side of shoestring fries), but brunch is, in my opinion, where Peacock shines.

Bananacinos!

On the beverage side of things, they have an amazing smoothie and juice bar, which lets you customize a smoothie with whatever your heart and stomach desire.  They also have a selection of recommended smoothies on the menu, and if you need your jolt of espresso in the morning, the bananacino smoothie is to die for.  Bananas mixed with a shot of espresso and honey seems like an odd combination, but trust me, it works.  The aforementioned mimosas are also good if you’re in the mood for something stronger than coffee.  The brunch menu has a wide selection of food, and you have the option to order sandwiches, salads, and burgers from the lunch menu if you want to.  But for me, it’s all about the breakfast items.  I’m more of a savory breakfast person myself, so always go for the egg-centric options, but they also have pancakes and waffles which have gotten rave reviews of friends.  The pancakes come with bananas and walnuts in warm maple syrup, and the waffles with strawberries tossed in balsamic vinegar, and both of those descriptions always have me reconsidering my faithfulness to eggs and bacon.

I am extremely partial to any good eggs Benedict, and these versions do not disappoint.  You can get classic eggs Benedict with ham or smoked salmon, or upgrade for poached eggs with lump crab meat.  I’ve had the crab eggs Benedict, and while good, usually go for the classic with black forest ham and a wonderful

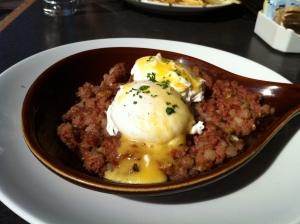
Corned beef hash

Hollandaise sauce.  The eggs are always poached to perfection, with set but still runny yolks that get everywhere and can be mopped up with the (bonus!) pile of fries that comes with them.  Gina got the corned beef hash, also not something one usually makes at home, which came in a big skillet of beef and onions with more perfect poached eggs on top.  It was also very good.  If you feel your main brunch course isn’t enough, the Applewood smoked bacon side order is seriously some of the best bacon I have ever had- smokey and just sweet enough, it will be gone from your plate in seconds.  There are lots of brunch items I haven’t tried yet, such as the omelets and a very classed-up breakfast sandwich, but this is a brunch in DC that is not to be missed.

Parmesan Baked Chicken Tenders

21 Mar

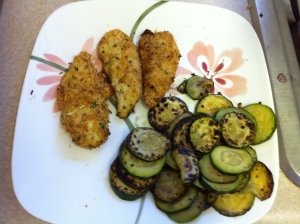
I negated the healthy non-frying of the chicken by frying the zucchini instead. Oh well.

Unfortunately my time in Qatar was not very exciting eating-wise, so I don’t have delicious drinks and baked goods to blog about like Gina did (although the juices, called “cocktails” in a dry-ish country, were delicious).  And while I could describe all of the contents of the extensive Doha Sheraton buffet breakfast, lunch, and dinner, I don’t think that would be too exciting for anyone.  So when I got home I was all buffet-ed out, went on a massive shopping spree at Trader Joe’s, and made these very simple, but very yummy, chicken tenders for dinner.  They are baked instead of fried, partly because it’s healthier, but mainly because it is also a lot less messy and easier- I can never seem to get the temperature of the oil right and end up with burnt-ish outsides by the time the chicken is cooked through.  When you drizzle the tenders with oil and bake them at a high heat they still get satisfyingly crispy, and (bonus!) I can watch reruns of How I Met Your Mother while they are in the oven instead of getting splattered with oil.  I use a triple-dip method of flour-egg-breadcrumbs, which works very well for extra crunchy-ness, but if you want you could also just use egg and breadcrumbs, or substitute milk for the egg to get everything to stick.

Parmesan Baked Chicken Tenders
Adapted from Serious Eats, and my brain

Serves four

Equipment: 3 small bowls, baking sheet

Ingredients
1/3 cup breadcrumbs (I use 4C pre-seasoned ones)
1/3 cup grated Parmesan
1/4 cup flour
1 egg
1 1/2 pound chicken tenders, or chicken breasts cut into strips
2 tablespoons olive oil
Salt and pepper

Preheat oven to 450 degrees.  Place flour in one bowl, whisked egg in one bowl, and mix breadcrumbs and Parmesan in a third bowl.  If the breadcrumbs are unseasoned add salt and pepper, and dried herbs if you wish.  Line baking sheet with parchment paper or a silicone baking mat.  Dip chicken tenders one at a time in flour, egg, then breadcrumb mixture, making sure to let most of the egg drip off before putting it in the breadcrumbs.  Place the tenders one at a time on the baking sheet.  When they are all ready, drizzle with olive oil, and place in the oven for 15-20 minutes, or until golden brown and cooked through.

Quinoa Stuffed Peppers

27 Feb

Yummy stuffed peppers.

I saw this recipe a few weeks ago in Shape magazine, and despite my aversion to anything with the word “diet” in it, thought it looked like a pretty delicious lunch or dinner idea.  Plus, I’d been looking to experiment with quinoa (can we please just spell it qeenwa from now on?) since I keep hearing about how it is some crazy superfood that makes you live forever.  Or something like that.  I changed this recipe a bit, mainly making it much less healthy by adding more cheese than necessary and laughing at the idea of only using “salt free herb seasoning”.  But it ended up really well, and was extremely filling- I made two peppers at once but ended up saving most of one since the quinoa and vegetable stuffing was very hearty.  If you don’t want to go through actually putting the stuffing into the pepper, the filling would be very good as a side dish to a main course of chicken or fish.  Once you get the hang of cooking quinoa (apparently Gina had some sort of quinoa accident once, but it’s really not hard), it’s very easy to add to cold or warm salads as well.

Cheese and Quinoa Stuffed Peppers
Adapted from Cinch!
Makes 2 stuffed peppers

Equipment: Knife, cutting board, small saucepan, frying pan or skillet, baking sheet or baking dish

Ingredients
1/2 cup quinoa
1 cup water
2 red or green bell peppers
1 tablespoon olive oil
1/2 red or white onion, diced
1 clove garlic, diced
1/2 cup shredded carrots (optional)
1/2 cup baby spinach
1/2 cup sliced white mushrooms
1/2-3/4 cup cheddar cheese
1 tablespoon Parmesan cheese
1 tablespoon breadcrumbs
A few fresh basil leaves, minced
Salt and pepper to taste

Preheat oven to 350 degrees.  Place quinoa and water into a small saucepan, bring to a boil, then reduce to simmer, cover and let cook until all water is absorbed, about 20 minutes.  Cut the tops off the peppers, and remove the seeds and membranes.

Heat a frying pan or skillet on medium-high heat, add the olive oil, and once hot add the onion.  Saute for 3 minutes or until translucent, then add the garlic, carrots, baby spinach, and mushrooms.  Saute for another 5 minutes, or until vegetables are tender.  Add basil, and salt and pepper to taste, then take off the heat and transfer vegetables to a bowl.  Mix in the cooked quinoa and fold in the cheddar cheese.

Place peppers on a baking sheet or in a baking dish, and fill with the quinoa mixture.  Sprinkle breadcrumbs and Parmesan cheese over the top.  Bake uncovered for 20-25 minutes, or until pepper is slightly charred.  Serve warm or at room temperature.

Eating Our Way Through Brooklyn

23 Feb

The Red Hook waterfront

Mother Spice is off gallivanting in India (supposedly for work, although when we talked to her she seemed to be at a spa on the beach), so Gina and I came to New York for the weekend to keep our long-suffering father company.  The three of us decided to go on an adventure to Brooklyn, spurred by a trip to Brooklyn Gina and Father Spice took over the summer, which led to Father Spice discovering Brooklyn at about the same time The New York Times did (see: this).  Our trip to Brooklyn turned into us eating at no fewer than three places in one afternoon, visiting Williamsburg, Red Hook, Cobble Hill, and driving through multiple other places while Father Spice both a) gave us history lessons (always fun!), and b) went into a 30 minute discussion with himself about why it was a mistake that we didn’t think more seriously about moving there when we first came to NY.

Oops, we ate half of this before remembering the picture

We ended up grabbing lunch at a decent-but-nothing-exciting Thai place in Williamsburg, and then went on to Red Hook, original home of Red Hook Lobster Pound, a spattering of little boutiques among the old industrial buildings, and our destination: Baked.  Baked has been featured both on Serious Eats, for being the Best Cupcake in New York, and on Food Network’s “The Best Thing I Ever Ate”, for their salted chocolate brownie.  So it was pretty inevitable that we would be going there to sample some butter-laden goodies.  We tried the red velvet cupcake with cinnamon frosting, the salted brownie, and a pumpkin chocolate chip pound cake.  All three were delicious, and I can absolutely see why one would go to Brooklyn just to stock up on brownies.  The cupcake was somehow both much moister and much lighter than any other I have tried (and trust me, living in a combination of DC and NY means I eat a lot of cupcakes), and the frosting was amazing and airy without being at all too sweet or cloying.  The salty-sweet combination of the brownie was also sublime, and it had a very rich, gooey, chocolate texture.  The pound cake was ordered as an afterthought by Father Spice, but was (surprise, surprise), also awesome, very moist and cakey with a great flavor combination of the pumpkin and chocolate.

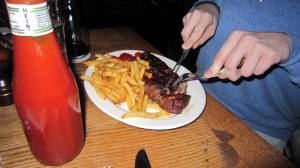
Prime Meats steak frites

After some more history lessons while looking out over the docks in Red Hook and driving around Prospect Park (did you know it was designed by the same person who created Central Park, which was inspired by a park in Liverpool, aka Father Spice’s hometown?), we headed over to the Carrol Gardens area for an early dinner at Prime Meats.  Prime Meats is well known in Brooklyn and was recommended to us by a family friend who seems to have eaten at every “best restaurant” in the city.  They take no reservations, but we got there at about 5:45 and only had to wait 10 minutes before being seated.  The atmosphere is very friendly and relaxed, and there were lots of families there while we were eating.  It was noisy without being overwhelming or annoying, and the brick walls and wood finishing with tealights around the window contributed to the casual feeling.  It was also quite reasonably priced for such a lauded place in New York City- it wasn’t cheap, but was less expensive than we thought it might be.

Brisket with cabbage and juniper berries (whatever they are)

The menu is very simple and only has a few main items on it, including a roast chicken, burger, steak, and brisket.  Gina and I split the duck salad to start, which had pieces of shredded duck as well as some slices of duck breast, with apple and toasted pumpkin seeds.  It was very good, as was Father Spice’s celery salad with a simple but delicious vinaigrette dressing.  For the main courses, I had steak frites, which was a very generous and well cooked steak with great fries, Father had the braised brisket with cabbage and juniper berries, which had come recommended to us and was also delicious, and Gina had the burger, which looked great and was finished by her in approximately two bites.  Seriously, I looked over about a minute after getting our food and it was gone already, so I’m gonna guess it was good.  I would definitely go back here under many circumstances- it would be a fun place to go with family, or with a group of friends for a casual but very tasty dinner.  And it’s within walking distance of the Carrol Gardens subway stop, so if you’re in NY consider taking a trip across the bridge for this, I promise you won’t be disappointed.

One chicken, endless possibilities

9 Feb
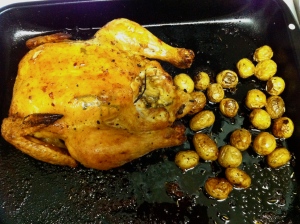
Small chicken. Tiny potatoes.

One night last week I was avoiding doing things like file for student aid and browsing some food blogs and found this recipe for “the best roast chicken ever” on smitten kitchen.  I was intrigued, and wanted to try it as 1) I don’t always love roast chicken (I tend to just eat my weight in the accompanying potatoes) and 2) I hadn’t made a big “real person” meal in a while.  But if you make a whole chicken for only one or two people you tend to have a lot of leftovers, and no mater how good this chicken was, I didn’t know if I wanted to eat roast chicken every night this week.  So I started to brainstorm about how I could use the leftovers from the potentially amazing chicken.

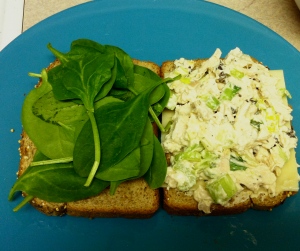
Chicken salad sandwich

Now, I wouldn’t say that I’m an overly frugal person, but realizing that I can save enough money during the week to finance my happy hour habit means that I make my own lunch pretty much every day.  So my brilliant idea to use up lots of chicken was to make chicken salad that I could make into lunch for work.  So resourceful! Since the chicken itself was only about 6$, and I already had most of the ingredients for chicken salad, this ended up being a very good idea for my wallet (and my stomach, but more on that later).  To make this chicken go further, I even decided to make chicken stock because most of the ingredients needed for chicken salad are also included in chicken stock.  It’s like this was all planned perfectly for me.  Moral of the story: one chicken = lots of meals for Roxie.

So how was the chicken? Really really good.  I’m normally a total white meat girl, but this skin was super crispy and I found myself pulling off the wings and drumsticks since they were so crispy on the outside and tender on the inside.  I will say that I hope you like your chicken with a side of smoke, because with this method you roast the chicken at a very high temperature which led to a lot of smoke from the fat burning off.  Also I skimped on the time you let the chicken rest while salted- apparently I was meant to season it and then wait two days to cook it, but really, who has that sort of time?  I waited an hour, it turned out fine.  Although if you have patience I’m sure resting it longer would make the meat even more flavorful and tender.  Don’t be intimidated by the long recipe- it’s really very easy. The chicken salad was also a huge success, and I will definitely make it or something similar again.  The stock is currently bubbling away on my stove, so fingers crossed that experiment also works out and leads to some soups to ward off a winter cold.  Who knew 6 bucks could lead to this much fun in the kitchen?

Perfectly Perfect Roast Chicken
Adapted from Zuni Cafe/Smitten Kitchen

Equipment: One baking dish or shallow pan to fit the chicken, knife

Ingredients:
1 small chicken (2 3/4 to 3 1/2 pounds if you can find it)
4 sprigs fresh rosemary (or other fresh herb)
Salt and Pepper
A little water

Prepare Chicken: Remove and discard the lump of fat inside the chicken. Rinse the chicken and pat very dry inside and out. Approaching from the edge of the cavity, slide a finger under the skin of each of the breasts, making 2 little pockets. Now use the tip of your finger to gently loosen a pocket of skin on the outside of the thickest section of each thigh. Using your finger, shove an herb sprig into each of the 4 pockets.

Season: Season the chicken liberally all over with salt and pepper. Season the thick sections a little more heavily than the skinny ankles and wings. Cover loosely and refrigerate for up to 2 days.

Cook: To cook, preheat oven to 475 or 450 if your oven gets very hot.  Place the dish you will cook the chicken in into the oven to heat it before the chicken starts to cook. Wipe the chicken dry, take the dish out of the oven (with gloves!), and place chicken breast side up in the oven.

Place the chicken in the pan in the center of the oven and listen and watch for it to start browning within 20 minutes. If it doesn’t, raise the temperature progressively until it does. The skin should blister, but if the chicken begins to char, or the fat is smoking, reduce temperature by 25 degrees. After about 30 minutes, turn the bird over — drying the bird and preheating the pan should keep the skin from sticking.  I used a spatula and oven gloves to do this.  Roast for another 10 to 20 minutes, depending on size, then flip back over to recrisp the breast skin, another 5 to 10 minutes. My chicken was almost 4 pounds, and I cooked it for a total of just over an hour.

Rest: Remove the chicken from the oven and turn off the heat. Lift the chicken from the roasting pan and set on a plate. Rest the chicken for at least 10 minutes before eating to allow the juices to distribute.

Chicken salad recipe (I modified a bit by taking out the grapes and replacing with raisins, but this is a good starter recipe)

Chicken stock recipe (again, I modified to use up what I already had in my fridge, but you need most of these ingredients to make the stock good)

Quick and Easy Garlic Soup

14 Dec

Sometimes all you need is a good bowl of soup

I’m at home for a few days in an attempt to not go completely crazy while studying for finals, which has meant a couple of nice, home-cooked meals. But our parents just seem to get busier and busier, so tonight I was in for dinner by myself and thought I’d cook something to give myself a study break. I’ve had this recipe for “Garlic Soup for One” bookmarked for a while, because it looked easy and comforting, and is also pretty much a pantry meal. At home, of course, the vegetable I used was kale, because ever since the summer that is all Father Spice buys. It was delicious though, and has me rethinking my spinach loyalties.

I liked this soup because it was easy and filling, and basically a one pot meal. It definitely could have done with a little more flavor though… I added hot Hungarian paprika at the end because I felt it was lacking, and could have done with even more kick. I also felt that the base definitely could have been vegetable broth rather than water. Ultimately, though, I wanted more garlic flavor! It felt kind of cheated expecting a “garlic soup” because I just didn’t get the flavor in there… I added two instead of the recommended one clove and would probably double it again next time. But overall this was a good basis for some pasta and vegetables… I probably put way too much of both for the amount of broth, but it turned out well!  I’m definitely going to play around with it and make it again.

Garlic Soup for One (Adapted from the New York Times)

Equipment: Small pot, spoon, knife or garlic mincer

Ingredients:

2 cups water

At least 2 plump garlic cloves, minced

Pinch of thyme

Pinch of hot paprika or chilli powder

Salt to taste (about ¼ tsp)

1 tsp olive oil

Handful fusilli, soup pasta, or similar

½ cup green vegetables like peas, broccoli, zucchini, spinach, or kale, chopped

1 egg

Pepper

Parmesan to finish

Method

Take egg out of fridge. Bring water to a simmer over medium-high heat in a small saucepan. Add garlic, thyme, paprika, olive oil and salt and simmer for about 15 minutes. Add the pasta and vegetables (if using quick-cooking vegetable, like kale, add it a little later than the pasta). Simmer until until pasta is cooked al dente, and taste for seasonings.

Beat the egg in a bowl with some fresh pepper, and whisk a small ladeful of the hot soup into it to temper it. Turn the heat off under the soup and add the egg, which should cloud. Pour into bowl, top with parmesan and enjoy!

An Interlude: Spinach and Chickpeas

21 Nov

I'm sure the Top Chef judges would fault my plating

First of all, because I’m sure at least some of you are wondering, let me reassure you that Roxie’s Thanksgiving dinner was a great success. The pie was awesome and made me very excited to get home and get baking for real Thanksgiving, and the rest of the dinner was delicious too. (The turkey came out perfectly, though I think they still had approximately half a bird left at the end of the night.)

I was craving something a little lighter in between that huge meal and the long weekend of eating that is in front of me, though, and this chickpea and spinach dish came to mind immediately. It’s hearty and flavorful, but also doesn’t make me feel like I’ve stuffed myself. It’s also made almost entirely of items I keep in stock, which is always a bonus. I think it makes a perfect lunch dish, except for the fact that it takes a little longer to make than I usually have for lunch– but it reheats really well, and I got three servings out of this recipe (which I halved from the original), when stretched with some toast.


The toast, mashed up as best I could

As Deb notes in the original, this is a very flexible recipe. I would say to add more spinach than you think you want, because it always shrinks so much. Add the spices conservatively, as there’s always time later on to taste and add more– one of the advantages of cooking without meat is it’s easy to taste-test! And don’t worry, we’ll get back to heavily-caloric Thanksgiving recipes without much ado.

Spinach and Chickpeas (Adapted from Smitten Kitchen)

Equipment: Large saucepan, wooden spoon, food processor (optional), colander

Ingredients:

2 1/2 tbsp olive oil

1/2 pound (225 g) spinach, washed

1 slice brown bread

1 large clove garlic, thinly sliced

1/2 tsp ground cumin

Pinch of red pepper flakes or  chili powder

1 tbsp red wine vinegar

1 15-ounce can chickpeas, drained and rinsed

1/4 cup tomato sauce (This time I used plain tomato sauce that you can find in little cans, last time I just used pasta sauce I had around. Both worked fine.)

1/4 tsp smoked paprika (optional)

Salt and pepper, to taste

Juice of half a lemon

Method:

Place a large saucepan over medium heat and add a tablespoon of olive oil. When it is hot, add the spinach with a pinch of salt (in batches, if necessary) and stir well. Remove when the leaves are just tender, drain in a colander and set aside.

Remove crusts from bread and cut into small cubes. Heat another tablespoon of olive oil in a frying pan over medium heat (I just used the same saucepan). Fry the bread for about 5 minutes or until golden brown all over, then add the remaining half-tablespoon of oil and the garlic, cumin and red pepper. Cook for 1 minute more or until the garlic is nutty brown.

Transfer to a food processor, blender or mortar and pestle along with the vinegar, and mash to a paste, or just bang it around with a wooden spoon off the heat until fairly mushy. Return the mixture to the pan and add the drained chickpeas and tomato sauce. Stir until the chickpeas have absorbed the flavors and are hot. Season with salt and pepper.

If the consistency is a little thick, add about 1/4 cup of water. Add the spinach and cook until it is hot. Check for seasoning and serve with paprika on top, or on toast.