Tag Archives: dinner

Corn Risotto and Stuffed Risotto Balls

23 Jul

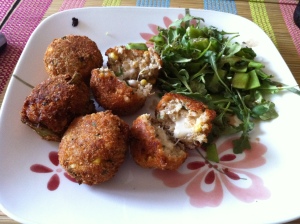
Fried risotto balls!

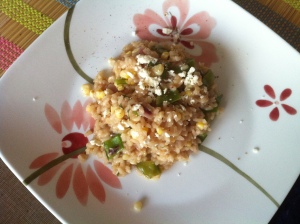
I have been seeing delicious corn recipes all over the place recently- charred corn salsa, corn tacos, grilled corn with feta, but yet when I impulsively bought two ears of corn at the farmers market I was at a loss for what to do with them. I decided to make risotto, and threw in some snow peas for good measure.  The fresh corn goes well with creamy risotto, and both the corn and the snow peas add a crunch to the finished dish.  In addition to the Parmesan that goes into pretty much any risotto, I crumbled feta in right at the end and sprinkled some on top of the risotto.  It was a delicious and filling summery dish, and (bonus!) I was able to make fried and stuffed risotto balls with the copious leftovers.

Yum corn risotto

Since risotto is a dish that needs to be made in large amounts I am always able to make at least three meals out of a batch, but this time I decided to play around and make risotto balls stuffed with mozzarella and fried.  The result was arguably even better than the risotto was when I first made it.  The cold risotto is mixed with breadcrumbs, egg, and more herbs, then a cube of mozzarella or other melty cheese is placed in the middle of a golf-ball sized risotto ball, and they are rolled in more breadcrumbs and fried to golden brown perfection.  These would make a great appetizer or starter at a party, but for me, several of them made an extremely satisfying dinner.

Fresh Corn and Snap Pea Risotto
Serves 6

Ingredients
6 cups chicken broth
1 bay leaf
3 tablespoons olive oil
1 medium onion, finely diced
1 1/2 cup arborio rice
1/2 cup dry white wine
1 cup fresh corn kernels (from 2-3 ears of corn)
5 oz snow peas, chopped
1/2 cup freshly grated Parmesan
1/2 cup crumbled Feta chees
2 tablespoons unsalted butter
2 tablespoons fresh basil leaves, chopped
Salt and pepper to taste

After chopping the vegetables, bring the chicken stock and bay leaf to a simmer in a medium saucepan.  In a large pan heat the olive oil over medium-high heat. Add the onions to the oil and sautee for 2-3 minutes, until softened.  Next add the rice and cook until opaque, about 3 minutes.  Add wine and cook until absorbed, another minute or so.  Then begin adding the stock, 1 cup at a time.  Add each cup of stock and cook over medium heat until absorbed, stirring frequently.  When the stock is absorbed into the rice add the next cup, and continue until all of the stock is gone and risotto is cooked, about 25 minutes.  Stir in the Parmesan, butter, basil, and season with salt and pepper to taste.  Crumble the feta into the risotto and mix in, then sprinkle plates with more feta if desired.

Stuffed Risotto Balls
Adapted from Giada de Laurentis’ Everyday Italian

Ingredients
Serves 4-6 (I assume as an appetizer, as I ate all of mine.)

2 cups cooked and cooled risotto
1 1/2 cup seasoned breadcrumbs
1/2 cup freshly grated Parmesan
1/4 cup fresh basil leaves, chopped
2 eggs, beaten
4 ounces fresh mozzarella, diced into 1/2 inch cubes
Vegetable oil for frying

Put 1 cup of breadcrumbs in a shallow dish.  In a bowl combine 1/2 cup of the breadcrumbs, the risotto, Parmesan, basil, and eggs.  Mix to combine, and then begin to form the balls.  With damp hands take about 2 tablespoons of the risotto mixture and shape into golf-ball sized balls.  Make an indent in the center of the risotto ball and add a cube of mozzarella, then cover the whole.  Roll the risotto balls into the breadcrumbs to coat. In a large saucepan, add about an inch of vegetable oil.  Heat over medium-high heat until about 350 degrees- to test without a thermometer fry a piece of bread in the oil, it should brown in about 2 minutes.  In batches, fry the rice balls, turning occasionally, until golden brown- about 4-5 minutes.  Take out of the oil and drain on paper towels before serving.
Summer Vegetable Pastas

20 Jun

Pasta with Prosciutto, Snap Peas, Mint and Cream

Taking a break from the plethora of potluck recipes (don’t worry, they will be back- I made amazing grilled ricotta chicken and homemade guacamole for our BBQ this weekend), I thought it would be nice to showcase some summery pasta dishes, using the fresh spring vegetables that are miraculously avaliable everywhere now.  Plus, clearly I can’t go a week without making some kind of pasta concoction, and I figure the addition of mounds of veggies helps me justify eating half a pound of pasta in one sitting.

So many vegetables- Pasta wtih Snap Peas, Asparagus and Goat Cheese

The first recipe is for pasta with prosciutto, snap peas, cream and mint, and I immediately bookmarked it when I saw it on Food 52 a couple of weeks ago.  Not only did I already have prosciutto in the fridge, but I love snap peas, AND it gave me an opportunity to use the first of the mint in our ever-burgeoning herb garden.  It may seem like this has a lot of things going on, but all of the flavors compliment each other nicely, and the snap peas add a crunch which is unexpected in a pasta dish.  I enjoyed that the mint added an extra fresh springy flavor, but if you don’t love mint in savory dishes this would be almost as delicious without it.  Despite having quite a few ingredients, this really just requires some chopping and then throwing everything into a pan, and it came together in pretty much the time it takes to boil and cook  the pasta.

After my discovery of this great combination of flavors I used leftover snap peas and some asparagus I had in the fridge for another summer-inspired pasta dish.  I was out of prosciutto and omitted the cream in this dish, but added goat cheese and fresh basil (also from our herb garden!) for an even simpler version.  Both recipes come together in under half an hour and are great uses of summer vegetables, so go down to your farmers market and get shopping!

Our herb garden! The basil is doing slightly better than the parsley. The mint is separate as apparently it is mean and overtakes everything.

Pasta with Prosciutto, Snap Peas, Mint and Cream
Adapted from Food 52
Serves 4

Equipment: Saucepan, frying pan, wooden spoon or spatula, knife

Ingredients:
4 cloves garlic, minced
3 tablespoons olive oil
1/4 pound prosciutto shank, finely diced (regular thin prosciutto works too)
4 shallots or 1/2 onion, minced
1/2 cup grated Parmesan cheese
1/2 pound fresh snap peas, chopped
1/4 cup fresh mint, chopped
3/4 pounds small pasta such as farfalle, penne, or orechiette
Salt and pepper to taste

Begin by chopping your vegetables. Put a pan of salted water on to boil.  Add pasta whenever it is boiling, but start to get your sauce ready in the meantime.  Do this by heating the olive oil over medium heat in a frying pan- when it is warm add the garlic and cook for 3-4 minutes, until fragrant but not burnt.  Add prosciutto and cook an additional 3-4 minutes (if using thin prosciutto cook only 1-2 minutes).  Add the shallots or onions and cook until they are beginning to soften, 3-4 minutes.  Season with salt and pepper.

With about 3 or 4 minutes left until the pasta is ready, add the peas to the frying pan.  After 2-3 minutes add the cream and quickly bring to a boil, stirring constantly.  Add the cheese, stir in, and reduce heat to low.  Drain the pasta when it is ready, and toss everything together in a big bowl. Add the chopped mint, garnish with more Parmesan cheese, and adjust salt and pepper to taste.

Pasta with Snap Peas, Asparagus, and Goat Cheese
Serves 2

Equipment: Saucepan, frying pan, wooden spoon or spatula, knife

Ingredients:
6 oz fresh snap peas (really however much you want- I used half of a 12 oz bag), chopped
1/2 bunch fresh asparagus, tough ends discarded and then chopped
1 clove garlic
4 oz goat cheese
1/4 cup fresh basil, chopped
1/8 cup grated Parmesan
2 tablespoons olive oil
Salt and pepper to taste

Put salted pasta water on to boil and chop your vegetables.  Add the pasta to the water when it is boiling, and heat up olive oil in a frying pan over medium heat.  When the oil is warm add garlic and cook for 2-3 minutes.  Next add the snap peas and asparagus, and cook for another 2-3 minutes.  Add salt and pepper to the vegetables.  Turn down the heat if the vegetables begin to brown while you wait for the pasta to cook.  Drain pasta when it is ready, reserving some of the pasta water.  Immediately toss with the vegetables, goat cheese, basil, and Parmesan.  If the sauce needs thinning add some of the pasta water, and add salt and pepper to taste.  Serve immediately with more Parmesan to garnish.

Fingerling Potato and Tuna Salad

12 Jun

Dinner! Or lunch! Or a snack! This works for everything.

I found this recipe on Serious Eats and immediately bookmarked it because it is made almost entirely of ingredients that are lurking somewhere in the depths of my very messy fridge or cabinets.  I don’t usually eat canned tuna, but after this I was reminded how versatile and tasty it is- I got the good-quality stuff packed in olive oil, but I’m sure regular old canned tuna would work just fine.  This isn’t a recipe for you if you don’t like quite strong flavors, as it includes red onions, capers, and the tuna, but since the potatoes make up the bulk of the salad the other ingredients aren’t too overwhelming, and all complement each other nicely.  This was delicious as a dinner served warm, and every bit as good straight out of the fridge the next day.  I simplified this a bit from the original, which called for multiple bowls and carrots and onions pretty pointlessly boiling with the potatoes to flavor them.  I’m making this salad again right now for lunch this week, and added some asparagus that I bought today to the mix to spice things up a bit and make it even more summery.

Fingerling Potato and Tuna Salad
Adapted from Serious Eats
Serves 2-3 (The original says 4, so apparently I eat twice as much as they anticipated.)

Equipment: Saucepan, bowl, knife
Ingredients:
1 bay leaf (optional)
1 pound fingerling potatoes, scrubbed
1/2 cup olive oil
4 tablespoons red wine vinegar
1 can tuna in olive oil
2 tablespoons chopped capers
1/2 red onion, finely diced
1/4 cup chopped parsley
Small handful arugula
1/2 bunch asparagus, chopped (optional)
Salt and pepper to taste

Put potatoes in a large pot of salted water and bring to a boil with a bay leaf if you have one.  Boil until tender, then drain and slice.  Toss with olive oil and vinegar in a large bowl.  Drain tuna and add to the bowl, along with the chopped onion, capers, asparagus, and parsley. Season to taste with salt, pepper, and more olive oil or vinegar if needed.  Add the arugula and toss together.  Serve warm or keep in the fridge and serve cold.


Rhubarb-Onion Compote plus Top Chef tour

18 May

Rhubarb compote, pork chop, and roast veggies. Yum.

I am a huge rhubarb fan, and have been craving some delicious rhubarb baked goods since the season started. But last night we were having pork chops for dinner, and I thought I’d pick up some rhubarb to try it out in a savory dish. We often make an apple-onion compote to go with pork chops, so I thought I’d sub in rhubarb for the apple and see how it turned out. I was pretty pleased with the results, though it hasn’t quite satisfied my craving for strawberry-rhubarb pie.

Rhubarb-Onion Compote
Equipment: Heavy-bottomed saucepan, knife, wooden spoon
Ingredients:
1/2 tbsp butter
1 medium-sized onion
About 7 stalks rhubarb
2 tbsp balsamic vinegar
2 tbsp sugar, or to taste (I used turbinado/raw sugar)
1 tsp ground ginger
Method: Roughly dice onions. Discard ends of rhubarb and chop into half-inch pieces. Melt butter in heavy-bottomed saucepan over medium-low heat. Add onions and cook over low heat until they are starting to soften, a few minutes. Add rhubarb, balsamic, and about a tablespoon of sugar, and ginger. Turn heat to low, and simmer for about fifteen minutes, stirring occasionally and making sure the bottom isn’t burning. Add a splash of water if things are starting to look dry, but rhubarb has a lot of water in it. Taste after fifteen minutes. If it is too tart, add more sugar. Rhubarb is quite tart, but the onion provides some sweetness as it cooks. It is done when the onion has lost all of its crunch. Serve over grilled pork chops.

In other food-related news, the Top Chef tour stopped at the Stew Leonard’s near us today, so I went to check it out. The basic idea of this tour is that they have two previous contestants, who come up and have fifteen minutes to make a dish using certain ingredients (they were given some time to prep beforehand, so this wasn’t exactly like the high-stress quickfires on the show). Then judges decide which chef wins. There were two judges from Foodspotting already there, but they picked one from the audience as well. Thanks to my Top Chef trivia knowledge, I got picked! The two chefs were Ash and Angelo, and the food was delicious. Angelo, of course, went all Asian-inspired with a mock kimchi and a spicy chocolate sauce on his beef (the sauce was incredible, but kind of overpowered everything else). Ash made a very fresh herby salad, with an amazing aioli that he made in front of us. We went with Ash as the winner, though I might try out that sauce of Angelo’s when the recipe goes up online. It was fun being able to chat to the chefs and eat the food that I’m always craving when I watch the show… definitely check out if the tour is stopping by near you!

Here are some pictures from the day:

Angelo's dish, a bit more Top Chef-y

Ash's winning dish

Ash makes his aioli

Angelo doing some blending action

Shakshuka (Eggs in Tomato Sauce)

8 May

Does this look like Mickey Mouse to anyone else?

I am a big fan of cheap dinners that use mainly ingredients I already have in my cupboard, and this is one of my favorite go-to weeknight dinners for when I want something more exciting than pasta or a baked potato.  It is an Israeli dish of a spicy tomato sauce with poached eggs and feta cheese, and is seriously delicious.  I suppose the addition of eggs make this a brunch-appropriate meal, but I will eat eggs any time of the day, and have always made this for dinner.  It really only takes about 15 minutes to throw together and another 20 or so to cook, so is easy enough to make whenever you want.  I usually make a big batch, and eat it a couple nights a week, heating up the sauce and adding more eggs as needed.   You can also use any leftover sauce with pasta, cous cous, or as a pizza sauce if you don’t want the eggs every time.  The spice level can also be adjusted to your tastes- I usually err on the side of caution and only add 2 jalapenos, but if you’re making a big batch I would recommend adding one more, as the peppers really lose their spice once chopped up and cooked.

Shakshuka
Adapted from Smitten Kitchen/Saveur Mag

Poached eggs simmering away

Serves 4 to 6

Equipment: Knife, large saucepan, wooden spoon, bowl

Ingredients:
1/4 cup olive oil
5 Anaheim or 3 Jalapeno chilies, stemmed, seeded and chopped finely
1 small to medium onion, chopped
5 cloves garlic, crushed then sliced thinly
1 teaspoon ground cumin
1 tablespoon paprika
1 28-oz can whole peeled tomatoes (diced works too)
6 eggs (or as many as needed)
1/2 cup feta cheese, crumbled
1 tablespoon fresh parsley, chopped (optional)
Pita bread for serving
Salt

Heat oil in a large saucepan over medium-high heat, then add chilies and onions and sautee until soft and golden brown, about 6 minutes. Add garlic, cumin and paprika, and cook, stirring frequently, until garlic is soft, another 2 minutes.

Put tomatoes and their liquid in a large bowl and crush with your hands (this is a seriously good stress reliever).  Add the crushed tomatoes and liquid to the saucepan, along with 1/2 cup water, and simmer about 15 minutes, stirring occasionally, until the sauce has thickened slightly.  Season with salt, then crack eggs over the sauce.  Cover saucepan and cook until the whites are set and yolk still runny, about 5 minutes.  Spoon out eggs and tomato sauce onto plates, and sprinkle the feta and parsley over each plate. Serve with pitas for dipping, or alternatively cous cous on the side.

Mushroom Lasagna

23 Apr

Finshed mushroom lasagna!

The Spice household has gone away to the mountains in Virginia for Easter weekend, and while other members of the family have productive things to do (sorry Gina, that 25 pg essay you’re writing next to me looks fascinating), I decided to use this time and my parent’s food budget to make delicious things for all of us.  I wanted to make a large dish that I usually wouldn’t make for myself, and following the success of my vegetable lasagna decided to go the baked-pasta/lasagna route again.  I found this recipe while browsing through one of my idol Ina Garten’s cookbooks, and thought it fit the bill perfectly.  Once I saw that Smitten Kitchen has also tried and had great success with this, I was completely sold.

Mmmmushrooms

To say the lasagna lived up to expectations would be an understatement- it was delicious and the four of us easily polished off the entire thing.  This is simpler than most lasagnas, as the layers are only a bechamel sauce, sauteed mushrooms, and Parmesan, but the simplicity really lets all of the flavors meld together beautifully.  The creamy sauce and Parmesan highlight the mushrooms and I didn’t feel like it was missing meat or tomato sauce at all.  This took about 2 hours to make start to finish, but only about an hour of preparation before it goes in the oven, and this was without any help chopping or assembling from my dear family.  The one complaint I have was that it used quite a few pots and pans for something that seems so simple- this was mainly because Ina suggests you heat the milk before making the bechamel, which adds a step but is probably necessary when making such a large quantity of sauce. I added a clove of garlic as per Smitten Kitchen’s suggestion and did a mixture of cremini and portobello mushrooms, but otherwise kept the recipe intact.

Mushroom Lasagna
From Ina Garten

Equipment: Knife, Baking dish (8×12 or 9×13), large pot, saucepan, frying pan

Ingredients:
Salt
Olive oil
3/4 pound dried lasagna noodles
1 large clove garlic, minced
4 cups whole milk
3/4 cup (12 tablespoons or 1 1/2 sticks) unsalted butter, divided
1/2 cup all-purpose flour
1 teaspoon freshly ground black pepper
1 teaspoon ground nutmeg
1 1/2 pounds cremini or portobello mushrooms (I used 3 portobellos and the rest cremini)
1 cup freshly grated Parmesan

Preheat the oven to 375 (I waited to do this until after the noodles were cooked and bechamel started).  Bring a large pot of water to boil, with some salt and oil.  Add the noodles and cook for 10 minutes.  Drain and set aside- if you feel they are going to stick a lot drizzle a bit more oil on them once drained.

Make the bechamel/white sauce: Bring milk and garlic to a simmer in a saucepan or heat in the microwave.  Melt one stick of butter in a large pot (I reused the pot the noodles cooked in). When the foam from the butter has subsided, add the flour over low heat, and whisk constantly for about a minute.  Start adding the milk into this mixture a little bit at a time.  When you add the first bit of milk, the mixture may clump and you will think you have gone wrong.  You haven’t.  Just keep adding the milk and stirring after each addition until the milk is all added and you have a thick white sauce.  Add salt, pepper, and nutmeg, and adjust seasonings to taste.  Take off heat and set aside.

Prepare mushrooms:  Discard the stems of the portobellos and trim stems of creminis. Slice mushrooms into 1/4 inch thick pieces.  Heat 2 tablespoons olive oil and 2 tablespoons butter in a frying pan or saucepan, and sautee half of the mushrooms with a pinch of salt for about 5 minutes, until they are releasing some liquid.  Remove those mushrooms into a bowl and repeat with 2 more tablespoons olive oil, butter, and remaining mushrooms.

To assemble:  Spread some sauce in the bottom of your baking dish, followed by a layer of noodles.  Then spread 1/4 of remaining sauce on top of noodles, followed by 1/3 of the mushrooms, and 1/4 cup of Parmesan cheese.  Repeat this twice.  For the final layer, top the noodles with remaining white sauce and another 1/4-1/3 cup Parmesan cheese.  Bake for 45 minutes, until top is browned and sauce is bubbling.  If you can resist digging in right away, let sit at room temperature for 10-15 minutes.  We did not let it rest and it was still excellent.

Restaurant Review: Hudson Restaurant and Lounge

19 Apr

Short rib with mac and cheese and fried onions

My roommate had a Groupon to Hudson (25$ for a 50$ gift card) so we decided to go on a roommate-date and celebrate spring and jobs and grad schools.  Since we had the gift card we ordered a lot of food, all of which was delicious.  Hudson has a modern-American feel and is smart, but doesn’t make you feel like you have to be dressed up to go there.  The food is also what I would describe as “Modern American”- things like Matzo Ball Soup, Tuna Tartare, Short Rib Tacos, Buttermilk Fried Chicken, and assorted brick oven pizzas.

Sangriaaa

We obviously started with a pitcher of white sangria (described as serving 6-8 people, yeah, ok. There were probably 4-6 glasses in there). The sangria was described as “white sangria fusion of martin codax albariño, grapefruit, pear, sage, and lavender with cabo wabo reposado x-rated fusion margarita topped with sweet lime espuma.”  Wow, that is quite the description, but basically it was grapfruity and good, but very tart.  It was a little hard to finish the pitcher just because you got so full from all of the juices in there, but I would recommend at least a glass or two.  They also have many other specialty drinks that sound equally complex but good.

To start we shared two “tasters”- Tuna Tartare with avocado and cucumber, and a Duck Confit Leg.  The tuna was delicious, very fresh tasting and bright tuna that went well with the avocado, and they gave you crispy wontons to scoop it all up with.  The duck was also great- duck can sometimes be dry or overly fatty, but this was cooked well and very flavorful.  The tuna was an appetizer sized portion, but if you weren’t too hungry the duck with potatoes and sherry sauce could fill in for a main course.

Tuna Tartare

For the main course I got the Braised BBQ Short Rib, with smoked Gouda mac and cheese and onion rings.  Since I have a hard time resisting mussels whenever I see them on a menu, I was very pleased that Lily ordered them so I could try some- these ones were Maine Mussels with a Thai curry and coconut sauce.  My short rib was good, but the plate got extremely messy.  The mac and cheese under the meat could have probably been a main course by itself, and you would have to be very hungry to finish it all.  The creamy mac and cheese went well with the crispy onions and tender short rib, and my only complaint would be that together it was a rich dish, and a tiny bit salty for my taste.  Lily’s mussels were yummy- the Thai curry sauce was light and not overpowering, and we got Parmesan Truffle fries as well that were good, although could have been crispier.  But put truffle on anything and I will eat it so I was certainly not complaining.

All in all this was a satisfying and tasty meal, and I would go there again for a special occasion or just when I want to treat myself.  The happy hour specials are good, and they have items on the menu (such as pizzas) which are quite affordable and I’m sure every bit as good as the more expensive options.

Kale Quiche

13 Apr

Slightly mis-shapen quiche

Due to Father Spice’s well documented love of kale, I thought I would pick some up at Eastern market when Gina and I went a couple of weeks ago.  I ended up getting a very large bag of it for a good price, and have been trying to think of creative kale-uses ever since.  Last weekend I decided to bake the first of the kale into a quiche, which seemed like an easy way to use some up and feed myself and my roommate for a couple of nights.  It was a roaring success, and very easy to make- just remember that the crust needs to chill for an hour or so before you roll it out, so make that part first, then wander around the house watching Say Yes to the Dress for a bit.  This crust was excellent- very flaky and crispy, and I was glad that I didn’t trim the edges but just folded them over for an even better crust-to-egg ratio.  I would probably add more cheese the next time I make it so the flavor really comes through, so I’ve upped the amount in the recipe below, but if you want to pretend to be health-conscious for a night use a bit less.  You could also add some sauteed onions, garlic, herbs, etc, to up the flavors, but I was being lazy so just focused on the kale.

If you ignore the stick of butter, it looks healthy!

Kale Quiche
Adapted from Smitten Kitchen/Bon Appetit and Martha Stewart, among other random internet findings
Serves 4-ish

Equipment: Pie dish/tart pan (I used a 9-inch pie dish), food processor or pastry cutter, rolling pin

Ingredients:
For the crust:
1 1/4 cups all-purpose flour
1/2 cup (one stick) butter, chilled and cut into small pieces
1/4 cup ice water
1/2 teaspoon salt

For the filling:
1 bunch kale (I don’t really know what this means- I used half of a very large bag)
1/2 tablespoon oil
4 eggs
1/4 cup half and half or milk
1/2 cup grated cheddar
1/4 cup grated Parmesan
1/4 teaspoon salt
1/4 teaspoon pepper

Start by making the crust- first put a couple of ice cups in some water and set aside.  Put the flour and cold sliced butter into a large bowl and cut with a pastry cutter until the butter is the size of small peas. Alternatively, pulse in a food processor a few times.  Add the iced water one tablespoon at a time (or drizzle into the food processor while running), only until the dough comes together and you are able to form it into a ball.  It should just stay together without falling apart.  Form the dough into a ball, wrap in clingfilm, and chill for at least an hour.

For the filling, first remove and tough stalks from the kale pieces.  Rinse the kale in water, and the saute with 1/2 tablespoon oil for 3-5 minutes or until bright green and tender. Let cool.  Add eggs, half and half, the cheeses, and salt and pepper to a bowl and whisk to combine, then add the kale and mix that into the egg mixture as well.

Preheat oven to 375 degrees. To assemble, roll the chilled dough out into a circle and press into a lightly greased pan.  Pour in the egg mixture and fold over or trim the excess dough.  Bake for 20-30 minutes, or until crust is light brown and filling puffed.  Up the temperature to 400 for the last 5 minutes or so if you want the crust to get more golden.

Parmesan Baked Chicken Tenders

21 Mar

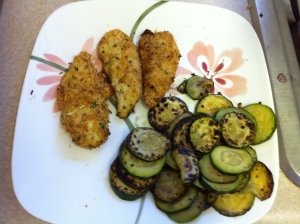
I negated the healthy non-frying of the chicken by frying the zucchini instead. Oh well.

Unfortunately my time in Qatar was not very exciting eating-wise, so I don’t have delicious drinks and baked goods to blog about like Gina did (although the juices, called “cocktails” in a dry-ish country, were delicious).  And while I could describe all of the contents of the extensive Doha Sheraton buffet breakfast, lunch, and dinner, I don’t think that would be too exciting for anyone.  So when I got home I was all buffet-ed out, went on a massive shopping spree at Trader Joe’s, and made these very simple, but very yummy, chicken tenders for dinner.  They are baked instead of fried, partly because it’s healthier, but mainly because it is also a lot less messy and easier- I can never seem to get the temperature of the oil right and end up with burnt-ish outsides by the time the chicken is cooked through.  When you drizzle the tenders with oil and bake them at a high heat they still get satisfyingly crispy, and (bonus!) I can watch reruns of How I Met Your Mother while they are in the oven instead of getting splattered with oil.  I use a triple-dip method of flour-egg-breadcrumbs, which works very well for extra crunchy-ness, but if you want you could also just use egg and breadcrumbs, or substitute milk for the egg to get everything to stick.

Parmesan Baked Chicken Tenders
Adapted from Serious Eats, and my brain

Serves four

Equipment: 3 small bowls, baking sheet

Ingredients
1/3 cup breadcrumbs (I use 4C pre-seasoned ones)
1/3 cup grated Parmesan
1/4 cup flour
1 egg
1 1/2 pound chicken tenders, or chicken breasts cut into strips
2 tablespoons olive oil
Salt and pepper

Preheat oven to 450 degrees.  Place flour in one bowl, whisked egg in one bowl, and mix breadcrumbs and Parmesan in a third bowl.  If the breadcrumbs are unseasoned add salt and pepper, and dried herbs if you wish.  Line baking sheet with parchment paper or a silicone baking mat.  Dip chicken tenders one at a time in flour, egg, then breadcrumb mixture, making sure to let most of the egg drip off before putting it in the breadcrumbs.  Place the tenders one at a time on the baking sheet.  When they are all ready, drizzle with olive oil, and place in the oven for 15-20 minutes, or until golden brown and cooked through.

Caramelized Onion, Mushroom and Goat Cheese Pizza

3 Mar

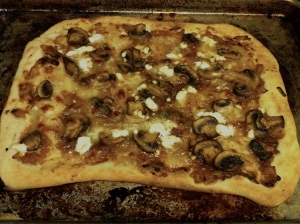
Finished pizza! I ate it all. Don't judge.

Gina and I are global spices, and will both be traveling for the next couple of weeks (her in Spain, me in Qatar- I am very jealous of all the sangria she gets), so I thought I would write this up before I fly halfway around the world for an undetermined amount of time.  My roommate and I have become quite the pizza experts recently, and this is what I made for dinner tonight.  My main objective was to use up all of the things I have in the fridge, but this ended up being an excellent combination of flavors for a pizza or flatbread.

I read a Serious Eats article on how to quickly caramelize onions recently, and wanted to try out the technique.  It worked extremely well, and I really did have delicious onions in about 15 minutes.  If you’re into food experimenting, I recommend reading the entire article, but if not I outline the easy method below.  I added some mushrooms and goat cheese to complement the onions, and the end result was excellent. Try it sometime soon!

Caramelized Onion, Mushroom and Goat Cheese Pizza
Serves 1 hungry person, or 2 less hungry people

Equipment: Knife, sheet pan, frying pan or skillet

Ingredients:
1/2 package pre-made pizza dough or homemade pizza dough
1/2 large yellow onion, diced finely
1 tablespoon sugar
1/4 teaspoon baking soda
1 tablespoon butter
1/4 cup water
1/2 pint white mushrooms, sliced
1/4 cup mozzarella cheese, shredded
3 tablespoons goat cheese
Salt and pepper
Olive oil

Preheat oven to 450 degrees and take pizza dough out of the fridge for 20 minutes.  Heat sugar in a frying pan or skillet over medium-high heat until it has melted and turned light brown, about 3 minutes.  Add onions and coat with the sugar, then add 1/2 tablespoon of butter, 1/4 teaspoon of baking soda, 1/2 teaspoon salt and a bit of pepper.  Cook the onions, stirring in the pan occasionally, for about 5 minutes.  Add two tablespoons of water and scrape the bottom of the pan with a wooden spoon.  Let the water evaporate, then add water and mix again- do this two more times (adding water 3 times in total).  When onions are deep brown, put them into a mixing bowl.

In the same pan the onions were in, add another 1/2 tablespoon of butter.  Add the mushrooms and cook for 3-5 minutes, or until they are brown and starting to crisp.

To assemble pizza, spray the sheet pan with olive oil, and stretch out the dough using your fingers or a rolling pin.  When the dough is thin, place on the baking sheet.  Spread the caramelized onion-jam onto the dough as a base, followed by the mushrooms.  Then evenly spread the mozzarella cheese over the pizza, followed by crumbles of goat cheese.  Bake in the preheated oven for 10-15 minutes, until crust is golden and cheese bubbling.