Tag Archives: cheap

Shakshuka (Eggs in Tomato Sauce)

8 May

Does this look like Mickey Mouse to anyone else?

I am a big fan of cheap dinners that use mainly ingredients I already have in my cupboard, and this is one of my favorite go-to weeknight dinners for when I want something more exciting than pasta or a baked potato.  It is an Israeli dish of a spicy tomato sauce with poached eggs and feta cheese, and is seriously delicious.  I suppose the addition of eggs make this a brunch-appropriate meal, but I will eat eggs any time of the day, and have always made this for dinner.  It really only takes about 15 minutes to throw together and another 20 or so to cook, so is easy enough to make whenever you want.  I usually make a big batch, and eat it a couple nights a week, heating up the sauce and adding more eggs as needed.   You can also use any leftover sauce with pasta, cous cous, or as a pizza sauce if you don’t want the eggs every time.  The spice level can also be adjusted to your tastes- I usually err on the side of caution and only add 2 jalapenos, but if you’re making a big batch I would recommend adding one more, as the peppers really lose their spice once chopped up and cooked.

Shakshuka
Adapted from Smitten Kitchen/Saveur Mag

Poached eggs simmering away

Serves 4 to 6

Equipment: Knife, large saucepan, wooden spoon, bowl

Ingredients:
1/4 cup olive oil
5 Anaheim or 3 Jalapeno chilies, stemmed, seeded and chopped finely
1 small to medium onion, chopped
5 cloves garlic, crushed then sliced thinly
1 teaspoon ground cumin
1 tablespoon paprika
1 28-oz can whole peeled tomatoes (diced works too)
6 eggs (or as many as needed)
1/2 cup feta cheese, crumbled
1 tablespoon fresh parsley, chopped (optional)
Pita bread for serving
Salt

Heat oil in a large saucepan over medium-high heat, then add chilies and onions and sautee until soft and golden brown, about 6 minutes. Add garlic, cumin and paprika, and cook, stirring frequently, until garlic is soft, another 2 minutes.

Put tomatoes and their liquid in a large bowl and crush with your hands (this is a seriously good stress reliever).  Add the crushed tomatoes and liquid to the saucepan, along with 1/2 cup water, and simmer about 15 minutes, stirring occasionally, until the sauce has thickened slightly.  Season with salt, then crack eggs over the sauce.  Cover saucepan and cook until the whites are set and yolk still runny, about 5 minutes.  Spoon out eggs and tomato sauce onto plates, and sprinkle the feta and parsley over each plate. Serve with pitas for dipping, or alternatively cous cous on the side.

Farmer’s Market Bounty: Simple Asparagus Dishes

16 Apr

Sweet potato fries and asparagus

I got a little over-excited at the farmer’s market last weekend. I’m just so excited that we are finally seeing a couple new vegetables after a very long winter, that I had to buy a ton even though I knew I already had a lot of food in the house. I’ve been most excited about seeing asparagus everywhere (though as soon as the rhubarb comes in I’m sure I’ll be buying that up by the truckload), but I’d gotten bored of steaming it so I decided to do a couple other, equally simple, dishes with it this week.
The first was my justification for buying a pint of fingerling sweet potatoes, purely because they were adorable. I figured they would be perfect for baked sweet potato fries– hardly any cutting to do! And since roasted asparagus is delicious, I plonked some asparagus on to the pan for the last ten minutes of baking. Perhaps not a complete meal, but a delicious one.

Fingerling sweet potatoes from farmer's market versus massive sweet potato from Whole Foods

The next night I realized I still had a ton of asparagus, and my swiss chard was quickly looking very sad indeed. So I sauteed up the vegetables, added some lemon and spaghetti, and made a delicious pasta. Hooray for spring!
Baked Sweet Potato Fries and Asparagus
Equipment:
Baking sheet, sharp knife
Ingredients:
As many sweet potatoes as you want
As much asparagus as you want
About 1 tbsp olive oil
Salt, pepper, chili powder, and cinnamon, to taste
Method: Preheat the oven to 450F. Peel the sweet potatoes if you want, but I don’t find it necessary. Cut the sweet potatoes into some sort of fry-shape (with the fingerlings, I just quartered them lengthwise). Toss in olive oil, and sprinkle over any seasonings you want (I used those listed above). Spread out into a single layer on the baking sheet, and put in the oven for about 15 minutes. While baking, break off the tough ends of the asparagus, and toss in bowl you tossed the sweet potatoes in, adding more oil if you want.
After 15 minutes, the sweet potatoes should be fairly tender. Stir them around a bit, and throw the asparagus on top, trying to spread it out evenly again but don’t worry if it doesn’t fit in one layer. Put back in the oven for about 10 minutes, at which point the asparagus should be done, and the sweet potatoes crispy in places. Devour in one sitting.

So many good things in one pan

Spaghetti with Swiss Chard and Asparagus
Equipment: Pot, frying pan, knife
Ingredients:
One bunch swiss chard (it will shrink a lot)
Half a bunch asparagus (or more)
Spaghetti
1 tbsp olive oil
2 cloves garlic
Juice 1/2 lemon
1 tbsp butter
Salt and pepper
Method: Put a large pot of salted water on to boil. While waiting to boil, roughly chop the swiss chard. Break off the tough ends of the asparagus (if you bend the stalk, it will naturally snap where it is tough). Discard or save for another use (such as in broth). Cut the stalks and heads into roughly one-inch pieces. Peel the cloves of garlic, and smash with the broad side of a knife. When water boils, add enough spaghetti for about two people. While it is cooking, heat olive oil in frying pan over medium heat. Put garlic in oil, and cook until it softens at edges, about a minute. Add asparagus and swiss chard. Season with salt and pepper and saute, stirring occasionally, until swiss chard is wilted and asparagus is cooked, but with some bite, about 6 minutes. Remove from heat if it is done before spaghetti.
When it is cooked al dente, drain spaghetti and toss into frying pan along with 1 tbsp butter and juice of half a lemon. Return pan to heat, and toss with vegetables until butter is melted. Taste, and add more lemon juice or seasonings if desired. Eat immediately. Serves two.


Sweet Potato and Kale Soup

17 Feb

Thanks to Spice cousin Alida for the beautiful Polish bowl!

It’s true, Father Spice has finally gotten to me with his kale-obsession. I was craving kale hardcore last week and so went and bought two huge bunches from Whole Foods. Two bunches of kale for one person (who is going away for the weekend and thus needs to eat it quickly) is, apparently, quite a lot of kale, but I have been enjoying it thoroughly. I made some delicious kale chips to snack on, steamed it as a side to my pancake dinner tonight (surprisingly a good combination), and put it in this soup.

About this soup. It’s awesome. The chunky sweet potato base makes it very filling– I tried eating bread with it once and it was way too much. It also kind of blew my mind because it’s a puree-type soup that I made without a blender. You can just mash the sweet potatoes once they are boiled, and then add the other stuff! This is a revelation that has me itching to go back and see if I can adapt all those soup recipes I’ve passed over because they require a food processor or blender… except that suddenly it is 60 degrees out and I am not craving soup quite so much anymore.

The curliness is deceiving-- use more kale than this!

But yes, this soup was delicious. I would definitely make some adjustments next time though, and have reflected that below. 1) Not enough kale! The kale-y flavor kind of got lost in the sweet potato and spices, and I just didn’t put enough in to begin with. 2) I definitely saw why sweet potatoes have the “sweet” in the name. Again, probably my fault as I omitted the pepper flakes when making it because I wasn’t feeling the spice. It probably would have done a good job at balancing the soup better. 3) I totally skimped on the raisins because I felt like a lot was already going on. They were actually awesome in the soup, and I added more every time I heated up leftovers.

Just bubbling away. It smelled awesome, by the way.

And finally, a word of (obvious) warning: I forget every time I make soup myself that it will be much hotter than soup I have heated up from a can. Do yourself a favor, and let it cool for a few minutes before you dig in! The hot pieces of kale were especially vicious.

Sweet Potato and Kale Soup (Adapted from KERF)

Equipment: Pot, potato masher or blender, big knife

Ingredients
About 2 pounds of sweet potatoes (What college kid has a kitchen scale? I used two huge and one mini one, for a very thick soup)
2 cloves garlic
1 can light coconut milk
1 cup other kind of milk (ie cow’s, but I used almond)
1 tsp garam masala or 1/2 tsp cinnamon, 1/2 tsp cumin, and pinch of cloves (or other spice combination of your choice!)
1/2 tsp salt
1/4 tsp black pepper
1/4 tsp red pepper flakes
4 cups kale (Ie however much kale you want)
1/2 tsp vanilla extract
1/4 cup raisins

Method
Wash sweet potatoes and cut into small (about 1 inch) cubes, leaving skins on if you want awesome pieces of chewy skin in your soup (you do). Dice the garlic. Add a bit of olive oil or cooking spray to a large pot over medium high heat, and add potatoes and garlic. Add coconut milk, other milk, and spices. Make sure potatoes are covered in liquid, otherwise add a bit more. Bring to boil, then reduce heat and simmer for about thirty minutes, or until potatoes are soft.
While potatoes are cooking, wash and trim kale of thick stems and tear or chop into bite-size pieces. When potatoes are soft, turn off heat and mash with a potato masher in the pot (or blend). Potato pieces should be gone but pieces of skin will remain. Add raisins, kale, and vanilla, and cook 8-10 more minutes, until kale is bright green. Allow to cool slightly, and serve!

Turkey Meatloaf with Raisins

5 Feb

I have always had something of an aversion to meatloaf. I think for something to be called “comfort food,” you have to have eaten it growing up… and I cannot imagine meatloaf ever being served in the Spice household. The texture, shape, look… everything about meatloaf kind of puts me off, and though I’ve tried decent versions, it’s never something that I would choose to eat if there are other options. (The look, by the way, is why there are no pictures on this post. Nobody would make this if you saw a picture first.)

But then I randomly bought some ground turkey at the grocery store the other week, and needed to use it up. I realized that everything I would normally do with ground meat is tomato-centric (chili, pasta sauce), and I’m trying to avoid tomatoes. So I was about to just freeze it and use it up later, when I stumbled across this recipe. I think the raisins and cous cous won me over—it actually sounded pretty good, and I decided to give it a try.

Well, I’m not going to say that I’m a total meatloaf convert, but this was definitely very good, and one of the easiest recipes I’ve ever made. The spices work well with the turkey, and I love the raisins in it. The only thing I would probably change next time is to use a different, bigger grain. I think the cous cous added to the whole “weird texture” problem I have with meatloaf (also not helped by using ground turkey, which I find inherently weird). I would try using a bigger grain, but pre-cooked. Other than that, this was an awesome recipe that I will probably use again!

Note: Recipe below is how I made it, without accompanying sauce. Follow link for sauce instructions!

Turkey/”Moroccan-Inspire” Meatloaf (Adapted from Better Homes and Gardens)

Equipment: Mixing bowl, knife, loaf or square-shaped pan

Ingredients
1 cup raisins
1/2 small red onion
1/2 cup uncooked cous cous, or cooked other grain
1 tsp salt
1 tsp curry powder
1/2 tsp cinnamon
1 lb ground turkey
1 egg, lightly beaten

Method

Put water on to boil. Preheat oven to 425 degrees F. Roughly chop the onion, and combine in a bowl with the raisins, cous cous, salt, curry powder, and cinnamon. Pour in 3/4 cup boiling water and cover for two minutes. And the turkey and beaten egg, and mix well. Pour into foil-lined and greased (or just greased) loaf tin or 8×8 pan. Bake in the top third of the oven for 20-25 minutes, until baked through and no longer pink. Makes about 6 servings.

How to Poach an Egg with Minimal Crying/Frustration

13 Jan

Poached eggs!

Have I mentioned that breakfast is my favorite meal? Well, it is. Except for dinner.  But it definitely beats lunch by a long shot.  I used to detest breakfast, as I’m sure my mother would tell you.  This didn’t really have to do with not liking the actual eating of food, rather just the fact that I also tend to value my sleep a lot, and never saw the point in giving up 10 precious minutes in bed to force a piece of toast down my throat before going to school in the morning.  Despite my aversion to waking up early (in middle school I had an infamous shirt with the phrase: “Morning person– not!” on it), I have always loved a good breakfast/brunch, especially a huge full English breakfast, the likes of which would probably give anyone not familiar with it heart attack.  In my opinion however, fried bread, sausages, eggs, bacon, and baked beans should be additions to every breakfast table (I usually do without the black pudding though. No thanks).

I know you wish you could eat this every morning...right? Anyone? Whatever, it looks delicious to me.

Sadly, I do not usually have the time or ingredients to make myself an English breakfast on the weekend mornings when I have enough time to make anything, so I save those for family brunch trips to Soho House in New York.  Instead, I tend to rely on tried-and-true favorites such as my famous scrambled eggs (which I may at some point blog about, but only if I decide to give away my secret recipe), soft-boiled eggs with toast soldiers, and poached eggs on toast or with other breakfast fare.  I know poached eggs seem intimidating, but they are actually pretty easy to make once you’ve practiced a couple of times (or just buy something like this).  Some people use white vinegar to help the whites coagulate, but I don’t particularly feel like buying white vinegar for this one purpose, so make do without.

Oops, lost some egg whites in the tornado.

When I’m making poached eggs I just bring a big pot of water to boil, turn down the heat very slightly so the bubbles aren’t going crazy, and create a tornado-like swirl with a wooden spoon.  Then very quickly either crack an egg or slide an egg you have already cracked into a bowl into the middle of the water, and kind of coax the water back into a swirl with your spoon again for a couple of turns.  At this point the water will probably be very foamy with egg white that has floated to the top, but the key is to have faith that your egg will cook and come together.  Cook for 2-3 minutes and you should have a perfectly soft poached egg.  It definitely takes a couple of practice tries to get the technique down, but as long as you come to terms with losing a couple of eggs in the process you should be fine.  The recipe below is poached eggs with avocado toast, which is a delicious and cheap combination, and as a bonus, only requires you to have three ingredients in your kitchen!

Poached Eggs on Avocado Toast
1 serving

Equipment: Large saucepan, wooden spoon

Ingredients:
1/2 of a whole, ripe avocado
2 whole eggs
2 slices bread
Lemon juice
Salt and pepper

Begin by boiling a large pot of water to poach the eggs in. When the water is boiling, put your bread in the toaster and then get ready to poach some eggs! Have your eggs out of the container and right next to the pot, and using a wooden spoon, begin to stir the water so it is moving very fast in a circular motion. When the water is spinning around crack the first egg into the center of the pot, pick up your spoon and continue to move the water in a circular motion. The white should congeal around the yolk in a few seconds; don’t worry if you lose some of the whites to the surface! Cook for 2 1/2 minutes until white is set and yolk is runny inside.

While egg is cooking, take the bread out of the toaster and halve your avocado. Divide one half of the avocado and spread over both pieces of toast (save other half for another use), then squeeze a little lemon juice over each piece. When the egg is ready, remove with a spoon (preferably slotted, but just try not to get too much water in it if you don’t have one) and place onto the avocado-toast. Repeat the process with the second egg. Salt and pepper your eggs before serving, and enjoy!

Quick and Easy Garlic Soup

14 Dec

Sometimes all you need is a good bowl of soup

I’m at home for a few days in an attempt to not go completely crazy while studying for finals, which has meant a couple of nice, home-cooked meals. But our parents just seem to get busier and busier, so tonight I was in for dinner by myself and thought I’d cook something to give myself a study break. I’ve had this recipe for “Garlic Soup for One” bookmarked for a while, because it looked easy and comforting, and is also pretty much a pantry meal. At home, of course, the vegetable I used was kale, because ever since the summer that is all Father Spice buys. It was delicious though, and has me rethinking my spinach loyalties.

I liked this soup because it was easy and filling, and basically a one pot meal. It definitely could have done with a little more flavor though… I added hot Hungarian paprika at the end because I felt it was lacking, and could have done with even more kick. I also felt that the base definitely could have been vegetable broth rather than water. Ultimately, though, I wanted more garlic flavor! It felt kind of cheated expecting a “garlic soup” because I just didn’t get the flavor in there… I added two instead of the recommended one clove and would probably double it again next time. But overall this was a good basis for some pasta and vegetables… I probably put way too much of both for the amount of broth, but it turned out well!  I’m definitely going to play around with it and make it again.

Garlic Soup for One (Adapted from the New York Times)

Equipment: Small pot, spoon, knife or garlic mincer

Ingredients:

2 cups water

At least 2 plump garlic cloves, minced

Pinch of thyme

Pinch of hot paprika or chilli powder

Salt to taste (about ¼ tsp)

1 tsp olive oil

Handful fusilli, soup pasta, or similar

½ cup green vegetables like peas, broccoli, zucchini, spinach, or kale, chopped

1 egg

Pepper

Parmesan to finish

Method

Take egg out of fridge. Bring water to a simmer over medium-high heat in a small saucepan. Add garlic, thyme, paprika, olive oil and salt and simmer for about 15 minutes. Add the pasta and vegetables (if using quick-cooking vegetable, like kale, add it a little later than the pasta). Simmer until until pasta is cooked al dente, and taste for seasonings.

Beat the egg in a bowl with some fresh pepper, and whisk a small ladeful of the hot soup into it to temper it. Turn the heat off under the soup and add the egg, which should cloud. Pour into bowl, top with parmesan and enjoy!

World Peace/Win People Over with Cookies Cookies

29 Nov

Magic on a plate

Gina was the first one of the Ginger Spices to make these cookies, but I have made them several time since and have no intention of stopping.  They are seriously delicious, melt in your mouth chocolaty, and on top of that are very simple, utilizing ingredients that I almost always have in my kitchen anyway.  I first read about them on Smitten Kitchen, which is where the “World Peace Cookies” name came about, and if you think that name is exaggerating the power of these cookies, you only need to try them to be converted.  I firmly believe that if served to any friend, boss or person you are trying to impress they will be immediately won over, and will continue to ask for “Roxie cookies” (or “Insert-your-name-here cookies”) every time you see them henceforth.  I personally have a certain friend’s mother who tried one of these intending just to taste one, then ate about three more, and now apparently asks after me all the time (admittedly, said friend may be exaggerating/this may not have to do solely with my baking skills, but I choose to believe in the power of cookies above all else).

Chopped chocolate. Say that three times fast.

I think it’s the texture of this type of cookie that make them so strange and addictive- they are apparently known as “sandies”, which makes sense because the dough sort of resembles sand and they crumble easily.  They also have a lot of brown sugar in them, which always reminds me of sandcastles, so I like to think that fact is somehow related to the name.  All you really have to do is chop some chocolate (which is super fun, therapeutic, and gets chocolate all over your hands in the best way possible), cream the butter with a stand mixer or hand held mixer, and then add all the ingredients until a dough forms.  The recipe makes a large amount, but trust me, you want to make it all.  Plus you divide the dough into two pieces to chill, so can easily bake one that day and save the other for a few days later when friends are banging down your door begging for these.  Or just for when you find you have eaten 25 cookies in three days and want some more.  They also keep very well in a container at room temperature, and as they are not chewy they last for about a week if for some crazy reason you see reason and decide not to eat them all in a day like me.

Sandcastle-like sugar

World Peace/Win People Over with Cookies Cookies
From Smitten Kitchen, from Dorie Greenspan (fantastic name, btw)

Equipment: Stand Mixer or Hand Mixer, or a whisk and very strong arms, sheet pan, sharp knife, cling film or tin foil

Ingredients:
1 1/4 cup flour
1/3 cup unsweetened cocoa powder
1/2 teaspoon baking soda
1 stick plus 3 tablespoons butter, at room temp
2/3 cup light brown sugar
1/4 cup sugar
1/2 teaspoon fleur de sel or 1/4 teaspoon fine sea salt
1 teaspoon vanilla extract
5 ounces bittersweet chocolate, cut into chunks, or 3/4 cup mini chocolate chips

Sift the flour, cocoa, and baking soda together. Working with a stand mixer or with a hand mixer in a large bowl, beat the butter on medium speed until soft and creamy.  Add both sugars, the salt and vanilla extract and beat for 2 minutes more.

Turn off the mixer. Pour in the flour and mix at low speed about 5 times, a second or two each time.  If there is still a lot of flour on the surface of the dough, pulse a couple of times more.  Continuing at low speed, mix for about 30 seconds more, just until the flour disappears into the dough — for the best texture, work the dough as little as possible once the flour is added, and don’t be concerned if the dough looks a little crumbly. Toss in the chocolate pieces and mix only to incorporate.

Turn the dough out onto a work surface, gather it together and divide it in half. Working with one half at a time, shape the dough into logs that are 1 1/2 inches in diameter. Wrap the logs in plastic wrap and refrigerate them for at least 3 hours.  Logs can also be frozen for a couple of months if desired.

When you are ready to bake, preheat oven to 325 and line baking sheet with parchment or silicone mats.  Slice logs with a sharp thin knife, if they fall apart just form them back together on the baking sheet.  Put them on the baking sheet with about an inch between (one log needs two batches), then bake for 12 minutes. They will still look very soft, but take them out and let them cool until they have hardened and can be handled.  Enjoy, and store any extras in airtight container!

An Interlude: Spinach and Chickpeas

21 Nov

I'm sure the Top Chef judges would fault my plating

First of all, because I’m sure at least some of you are wondering, let me reassure you that Roxie’s Thanksgiving dinner was a great success. The pie was awesome and made me very excited to get home and get baking for real Thanksgiving, and the rest of the dinner was delicious too. (The turkey came out perfectly, though I think they still had approximately half a bird left at the end of the night.)

I was craving something a little lighter in between that huge meal and the long weekend of eating that is in front of me, though, and this chickpea and spinach dish came to mind immediately. It’s hearty and flavorful, but also doesn’t make me feel like I’ve stuffed myself. It’s also made almost entirely of items I keep in stock, which is always a bonus. I think it makes a perfect lunch dish, except for the fact that it takes a little longer to make than I usually have for lunch– but it reheats really well, and I got three servings out of this recipe (which I halved from the original), when stretched with some toast.


The toast, mashed up as best I could

As Deb notes in the original, this is a very flexible recipe. I would say to add more spinach than you think you want, because it always shrinks so much. Add the spices conservatively, as there’s always time later on to taste and add more– one of the advantages of cooking without meat is it’s easy to taste-test! And don’t worry, we’ll get back to heavily-caloric Thanksgiving recipes without much ado.

Spinach and Chickpeas (Adapted from Smitten Kitchen)

Equipment: Large saucepan, wooden spoon, food processor (optional), colander

Ingredients:

2 1/2 tbsp olive oil

1/2 pound (225 g) spinach, washed

1 slice brown bread

1 large clove garlic, thinly sliced

1/2 tsp ground cumin

Pinch of red pepper flakes or  chili powder

1 tbsp red wine vinegar

1 15-ounce can chickpeas, drained and rinsed

1/4 cup tomato sauce (This time I used plain tomato sauce that you can find in little cans, last time I just used pasta sauce I had around. Both worked fine.)

1/4 tsp smoked paprika (optional)

Salt and pepper, to taste

Juice of half a lemon

Method:

Place a large saucepan over medium heat and add a tablespoon of olive oil. When it is hot, add the spinach with a pinch of salt (in batches, if necessary) and stir well. Remove when the leaves are just tender, drain in a colander and set aside.

Remove crusts from bread and cut into small cubes. Heat another tablespoon of olive oil in a frying pan over medium heat (I just used the same saucepan). Fry the bread for about 5 minutes or until golden brown all over, then add the remaining half-tablespoon of oil and the garlic, cumin and red pepper. Cook for 1 minute more or until the garlic is nutty brown.

Transfer to a food processor, blender or mortar and pestle along with the vinegar, and mash to a paste, or just bang it around with a wooden spoon off the heat until fairly mushy. Return the mixture to the pan and add the drained chickpeas and tomato sauce. Stir until the chickpeas have absorbed the flavors and are hot. Season with salt and pepper.

If the consistency is a little thick, add about 1/4 cup of water. Add the spinach and cook until it is hot. Check for seasoning and serve with paprika on top, or on toast.

Homemade Granola (aka Hippie Food)

16 Nov

Granola! (sorry for the weird lighting)

I feel like a hippie writing this, but I started to make my own granola this summer and it has become something of a hobby of mine. I’ve only ever used variations on Mark Bittman’s recipe, which I understand to be somewhat controversial because it doesn’t use any oil or other fat. While this does mean that there are no clumps in the granola, I think I prefer it this way. Granola really is the easiest thing in the world to make—just go to a good grocery or health food store and pick out whatever seeds and nuts you like, and toss it all together. I’ve been going to Whole Foods for this, but have been pretty disappointed by their selection—it seems they sell more pre-made granola in their bulk containers than they do seeds or nuts. I’ve put below the proportions I’ve settled on that matches my personal preference, but I urge you to go look at Bittman’s recipe for more ideas to figure out what you might like.

Homemade Granola Adapted from Mark Bittman

Equipment: bowl, brimmed cookie sheet, spatula/wooden spoon

My Ingredients:

6 cups rolled oats

Less than a cup sunflower seeds

More than a cup sliced almonds

3/4 cup dried unsweetened shredded coconut

1 teaspoon ground cinnamon

1 teaspoon vanilla

dash salt

dash nutmeg

1/2 cup maple syrup

1 and 1/2-2 cups dried fruit (mix of raisins and dried cranberries)

Method:

Preheat oven to 350 degrees. In a big bowl, combine all ingredients except dried fruit. Spread on cookie sheet and bake for 30 minutes or longer, stirring at least every 10 minutes to ensure it bakes evenly. Take it out whenever you feel it is done– the browner it gets, the crunchier it will be.

Remove pan from oven and stir in dried fruit. Cool on tray, stirring occasionally, and transfer to sealed container once granola reaches room temperature.

Enjoy with milk, yogurt, or as a snack on its own.

Butternut Squash and Sweet Potato Soup

5 Nov

Finished butternut squash and sweet potato soup, aka fall in a bowl

I’ve decided that the main difference between Gina and I on this blog (and also in life) is that she is a much more calculated and pre-planned type person.  I won’t say that she is more organized than me because I know both of our parents would beg to differ based on the permanent messy states of both of our rooms.  Anyway, she seems to be more of a follow a recipe pretty closely type of gal, while I like to experiment, and usually get ideas from a couple of recipes and then combine them or change most of the ingredients so that the end product is totally different and completely my own.  This is all my very roundabout way of saying I had absolutely no idea if this soup would be at all edible or good at all, but it was!  Which is good news for everyone because I would feel a little bad putting a recipe up that made everyone gag and encourage Gina to ditch her big sis and do this blog thing by herself.

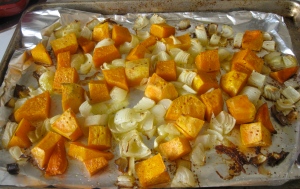
Roasted veggies out of the oven. Try to resist just grabbing a fork and eating all of these.

I’d never ventured into the land of soup before this, but found it surprisingly easy.  This particular recipe really couldn’t be simpler in terms of execution- all you have to do is throw the vegetables onto a pan to roast and then heat them in a pan with some stock and puree or mash them if desired.  I’ve been getting into Indian-type spices recently because they add so much flavor so easily, and here I used cumin, coriander, and garam masala, which all complimented the sweet potato and squash really well without being overwhelming.  If you don’t have all of those spices you could definitely only use a couple and up the quantities, or even just use some curry seasoning to get the same general effect.  I blended about half of the finished soup in my mini-food processor to make it smoother, but you could keep it all chunky and just mash up the vegetables with a spoon/potato masher, or you could puree the whole thing if you want.

The end product was seriously good and a perfect welcome to fall, which it seems has finally come out of hiding and arrived to DC.  Both butternut squash and sweet potatoes epitomize fall and thanksgiving for me, and they are very good ingredients in a soup since they can be broken up easily.  They also caramelize very well in the roasting, and I will definitely be making this soup or a variation on this again very soon!

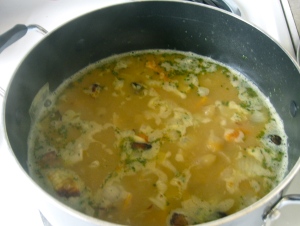
Big bowl of soup before the mashing begins

Butternut Squash and Sweet Potato Soup
Makes about 4 servings

Equipment: Sheet pan, good knife, oven, big pot or two smaller pots, potato masher/wooden spoon, food processor or immersion blender (optional)

Ingredients:

1 whole butternut squash, peeled and cut into medium dice
1 large sweet potato, peeled and cut into medium dice
1 yellow onion, cut into medium dice
2 tablespoons olive oil
4 cups (about 32 oz) chicken broth
1/4 teaspoon ground cumin
1/4 teaspoon ground coriander
1/4 teaspoon garam masala
1/2 teaspoon dried cilantro
1/4 cup half-and-half (optional)
Salt and pepper to taste

Method:

Preheat the oven to 425 F.

Start by peeling and cutting up the butternut squash, sweet potato, and onion. Put vegetables on a sheet pan covered with foil and drizzle with the olive oil and salt and pepper generously. Toss the mixture with your hands to coat everything in the oil, and roast in the oven for 30 minutes, or until squash and potato are tender.

When vegetables are ready, put them into a large pot with the chicken stock, and add cumin, coriander, garam masala, and cilantro. Bring pot to a simmer, and mash vegetables with a potato masher or spoon to break them up. Puree about half of the mixture to make it smoother, either in a food processor or with an immersion blender. Add the pureed mixture back into the pot, add the half-and-half if you want a richer taste, and serve.