Tag Archives: dessert

Walnut Chocolate Chip Banana Bread

22 Aug

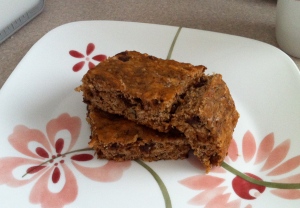
Banana bread with chocolate and walnuts

Is it really the 22nd of August- when did that happen?? Clearly the summer has gotten away from me, as I was in England and Italy for the first half of the month and barely had time to recover before going to New York to pack up our house before my parents’ impending move.  Given that I start grad school next week, I have a feeling my posts will be getting even more infrequent, but I do have a stack of things to post over the next few weeks.  I will start with this, which is sure to relieve any start of school stress we may be experiencing.

As usual, we had some almost-rotten fruit sitting in our fruit bowl  which had to be eaten immediately, so I decided to try out this recipe for banana bread from Smitten Kitchen.  Of course, I had the wrong pan so decided I would make the bread into brownie-sized pieces, and once I decided that I thought I might as well throw some chocolate chips and walnuts into the mix.  The result was wonderful, and lasted for over a week kept in the fridge.  Although the chocolate chips and butter don’t make this the healthiest breakfast, it is certainly one of the most tasty.

Walnut Chocolate Chip Bread
Adapted from Smitten Kitchen
Equipment: Large mixing bowl, wooden spoon, 9×13 pan or 4×8 loaf pan

Ingredients
4 very ripe bananas, smashed
1/3 cup melted salted butter (add a bit more salt if you have unsalted)
3/4 cup light brown sugar
1 egg
1 teaspoon vanilla
1 teaspoon baking soda
Pinch of salt
1 teaspoon cinnamon
1/2 teaspoon nutmeg
1 1/2 cup flour
1/3 cup chocolate chips
1/4 cup walnuts, chopped finely

Preheat the oven to 350 F.  With a wooden spoon, mix butter into the mashed bananas in a large mixing bowl.  Mix in the sugar, egg, vanilla, and then the spices.  Make sure to mix in the egg well.  Sprinkle the baking soda and salt over the mixture and mix in.  Add the flour and mix.  Finally, add the chocolate chips and walnuts and mix to incorporate.  Pour mixture into a buttered 9×13 pan, and bake for about 30 minutes.  Check after 25 minutes to see if a knife or toothpick inserted comes out clean.  Allow to cool for a few minutes, cut into squares and enjoy!  Keeps well at room temperature or refrigerated, stored in clingfilm or tinfoil.

Lemon Raspberry Yogurt Cake

1 Aug

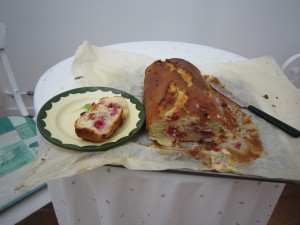
Delicious summer cake

Summer seems to have gotten away with us slightly. I still owe you a Morocco post, Roxie has now skipped off on her own vacation, and I have not done nearly enough cooking with all of the beautiful summer produce.

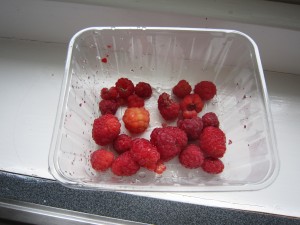
I attempted to "pick my own" raspberries for this, but seemed to have missed the good ones. (I bought extra)

This cake was my first attempt, post-Morocco, to rectify that. It is quick, it is delicious, and it is extremely versatile. Throw in whatever berry you want, switch out the lemon… I think a lime/raspberry combination would also be delicious. I had way fewer raspberries than called for and it still worked out fine, just more lemony than raspberry-y. Basically, this is a great cake to make the most out of summer fruit without too much effort.

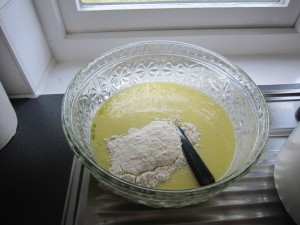
I couldn't find a whisk (or many baking supplies at all) in our English kitchen

Lemon Raspberry Yogurt Cake (Adapted, as always, from Smitten Kitchen)

Equipment: Mixing bowls, whisk, zester/grater, loaf tin or other cake pan (adjust baking time if using different sized pan)
Ingredients:
1 1/2 cups plus 1 tbsp all-purpose flour
2 tsp baking powder
1/4 tsp salt
1 cup plain whole-milk yogurt
1 cup regular sugar plus 1 tbsp caster/superfine sugar, if you have it
3 extra-large eggs
Zest of 2 lemons
1/2 tsp vanilla extract
1/2 cup olive oil
1 1/2 cup raspberries, fresh or frozen and thawed
1/3 cup freshly squeezed lemon juice
Method: Preheat the oven to 350F. Grease a standard loaf tin, then line with greaseproof paper and grease and flour the paper.
Sift together 1 1/2 cups flour, baking powder, and salt into a bowl. In another bowl, whisk together the yogurt, 1 cup of the sugar, the eggs, lemon zest, vanilla, and oil. Slowly whisk the dry ingredients into the wet ingredients. Toss the berries with the remaining tablespoon of flour, and carefully fold into the batter. Pour the batter into the prepared pan and bake for about fifty minutes, checking that a skewer inserted into the middle comes out clean.
Towards the end of the cooking time, make a glaze. If using granulated sugar, cook together the lemon juice and 1 tbsp of sugar until the sugar is dissolved and the mixture is clear. If using caster/superfine sugar, you can get away without cooking it if you’re lazy like me. (You can also get away with this if using granulated, and will have a nice crunchy glaze.)
When the cake is done, remove and allow to cool for ten minutes in the pan before flipping out onto a cooling rack. Pour the lemon-sugar mixture over the cake while it is still warm, with something underneath to catch the drippings. Little holes made with a toothpick in the cake help to draw the syrup in better. Cool and serve!

Strawberries, Two Ways

18 Jun

Summer in a cake

While we’re on the theme of excellent dishes to bring to barbeques/potlucks, both of these fit the bill. I hope you’ve been checking out your local farmer’s market recently, and if you have you probably have lots and lots of strawberries (and not too much other fruit yet, unfortunately). The first dish, a strawberry-balsamic flatbread-y thing, is awesome because it allows you to use up those strawberries even if you don’t want to make a dessert! The dough was also so much fun to work with– really pillowy and soft, it was very easy to knead, so don’t be put off by that. I did end up thinking the bread was a little dry, however– I might reduce the baking time next time. I also don’t think the bread itself would suffer from adding a few more flavorings (though this could be because I forgot to add the salt till the last minute. D’oh). But even as is, this was a delicious addition to a potluck my friends and I had last week.
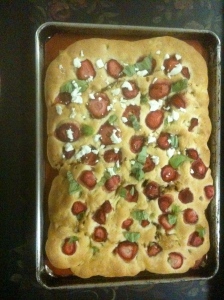
Foccacia/flatbread/delicious thing

The second dish is a super simple strawberry cake. Though it takes a little time to bake, it’s perfect if you want a dessert to use up a ton of berries and wow your friends (or yourself), without spending a long time messing with pie crusts or anything like that. My batter was a little thick and absolutely COVERED in berries, so I was a little unsure that it would rise up as shown in Deb’s pictures, but it turned out looking absolutely amazing. My one tip would be to layer up more on the edges than in the middle… the middle became basically a pool of strawberries on my cake, which was delicious but perhaps not optimal.
So hurry down to the farmer’s market (or, ok, the supermarket) and snap up some strawberries before the season’s over!

Cramming in as many strawberries as possible

Strawberry Balsamic Flatbread with Goat Cheese (Adapted from Joy the Baker)
Equipment: baking sheet
Ingredients:
5 teaspoons (about 2 packages) active dry yeast
1 cup warm water
3 cups of flour, divided into 1 cup increments
3 tablespoons olive oil, plus extra for drizzling
3 tablespoons sugar
1 1/4 teaspoon salt
zest 1 orange
1 cup thinly sliced strawberries (less than a pint)
coarse sea salt
1/2 cup goat cheese
balsamic vinegar
1 tablespoon fresh mint or basil

Method:

In a large bowl, sprinkle the yeast over the warm water.  Stir with a fork to dissolve and break up any clumps.  Add one cup of flour and blend together until smooth (can use the fork).  Cover with a tea towel and set in a warm place to rise for 1 hour. If your oven has a “proof” setting, and there is no warm place in your house, you can use this.

After the mixture has risen, remove the covering and stir in 3 tablespoons of olive oil, sugar, and orange zest.  Add one cup of flour and stir to blend.  Add the remaining cup of flour and salt and work together into a dough with a wooden spoon or your hands.

Place dough on a lightly floured surface and knead for 5 minutes.  If the dough is too sticky, add up to 1/3 cup more flour and knead.  Dough will be slightly sticky, and that’s alright.

Clean out the large bowl and coat with 1 teaspoon olive oil.  Place dough in the bowl, and flip it over so that it’s entirely coated in oil.  Cover and let rise in a warm place for 1 hour, or until doubled in size.

Punch the dough down and knead for just a minute, before pulling and stretching the dough into a 16×9-inch rectangle (a little smaller than a standard baking sheet). Place on a greased baking sheet and let rise, uncovered, for 30 minutes.

Place a rack in the center of the oven and preheat to 375 degrees F.

When dough has risen, use your fingers to make random indentations in the puffed dough.  Drizzle with olive oil (carefully, it is difficult to not have it all go in one place!).  Top with sliced strawberries, and sprinkle with coarse sea salt.  Bake bread for 30 to 35 minutes, until golden, crisp and baked through. As noted above, if you want it a little softer, perhaps bake for a little less time. If one side is browning faster than the other, rotate the pan once, halfway through baking.

Remove from the oven and allow to cool for 10 minutes.  Chop mint or basil and crumble goat cheese. Drizzle with balsamic vinegar, and then sprinkle with herbs and goat cheese. Slice into twelve pieces with pizza cutter. Serve immediately, it only really keeps for a day.

Simple Strawberry Cake (Adapted from Smitten Kitchen)
Equipment: Electric mixer (hand or stand), 9 or 10-inch springform or cake pan, or 10-inch pie pan

Ingredients:
1 1/2 cups all purpose flour (can substitute 3/4 cup for barley flour)
1 1/2 teaspoons baking powder
1/4 teaspoon table salt
1 cup plus 2 tablespoons granulated sugar
6 tablespoons unsalted butter, at room temperature
1 large egg
1/2 cup milk
1 teaspoon vanilla extract
1 pound (450 grams) strawberries

Method: Hull and halve the strawberries, set aside. Butter your 9 or 10-inch springform/cake pan, or 10-inch pie pan (or 9-inch deep-dish pie pan).
Preheat the oven to 350 F. In a small bowl, whisk together flour, salt, and baking powder. Set aside. In a larger bowl, beat butter and one cup sugar together with an electric mixer until pale and fluffy, about three minutes. Mix in egg, milk, and vanilla until just combined. Mixture may look slightly curdled, this is fine. Add dry mixture gradually, mixing until just smooth.
Pour (or spoon, in my case) into prepared pan. Spread mixture evenly, if needed, and arrange strawberries on top, cut side down, in as close to a single layer as you can get. (I had to overlap them a bit, and ended up using just shy of a pound because I felt there were enough on there.) Sprinkle remaining two tablespoons sugar over berries.
Bake cake for 10 minutes, then reduce oven temperature to 325 F and bake for another 50-75 (my time) minutes, until golden brown and a tester comes out free of wet batter. I found I was still getting some crumbs sticking to my tester after quite a long time, but eventually decided that was just due to the moistness of the cake. Let cool in pan on a rack, and serve. It should keep for two days, lightly covered, at room temperature.

Resturant Review: Serendipity 3 in Georgetown

2 Jun

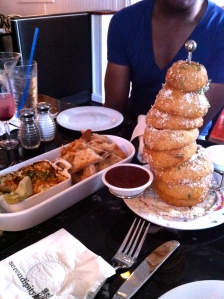
These are only the appetizers. Oh boy.

Brace yourselves, friends, because this one is going to be a doozy.  The newest Serendipity 3 opened in the heart of Georgetown on Memorial Day, and I was lucky enough to be invited to a friends-and-family preview night on Saturday.  One of my friends got four of us in for dinner, and, since we are all both foodies and fatties, we proceeded to devour a 3-course-plus-cocktail meal.  It was unfortunate that our next destination was up a very long hill.  Note to self: don’t eat that much ice cream before going anywhere other than your couch.

Weaver: "Wait. Will you take my picture already?" Thanks for the free food!

Weaver: "Wait. When are you taking my picture?" Thanks for the free food!

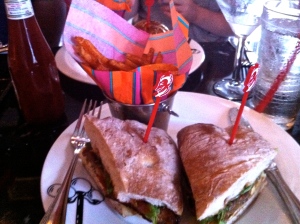
For appetizers we got the crab and artichoke dip, and a truly inspired choice of onion rings.  We all gasped as the tower of perfectly battered and fried rings descended upon us.  These were seriously the best onion rings I’ve ever had- cooked through and soft in the middle, with a crunchy thick shell, Parmesan cheese over them and dipping sauces on the side.  The crab dip was slightly overshadowed by the onion rings, but it was also great- lots of big chunks of crab in a not-too-creamy sauce with a nicely browned top.   For mains I got the Full Monty- chicken breast with bacon, pepper jack, arugula, and BBQ sauce on ciabatta bread. It was quite good- my only complaint was that the bread was a bit dry and I ended up eating much of the sandwich without the it.  Also it could feed a family of four.  The equally-large-portioned spaghetti and meatballs was also yummy, with ricotta on top of the meatballs and thick spaghetti.  The veggie burger and crab cake sandwich that rounded out our table were received very favorably as well.  On the downside, the sweet potato fries that were an option with sandwiches were not the best I’ve had (our batch wasn’t very fresh)- you would be better off getting the steak fries, which were tasty.

The Full Monty Sandwich.

After all of this, you would think we might call it quits before dessert.  But as anyone who has heard of or been to a Serendipity knows, dessert is their claim to fame, and their trademark “Frrrozen Hot Chocolate” is the most

Dessert!

famous offering.  We got one of the regular frozen hot chocolates and the red velvet sundae.  The hot chocolate was delicious- it’s just what you would imagine, basically hot chocolate mix mixed with ice and topped with whipped cream.  I like that it isn’t the consistency of ice cream, more a blended chocolate drink that makes it easier to eat/drink.   The red velvet sundae was an aggressive dessert choice- it is literally a huge piece of red velvet cake, on top of a also huge sundae.  To take this over the top, even the sundae glass is resting in a pool of hot fudge.  This was more intimidating than the hot chocolate, but very good, although the cake itself was a bit dry (since it rested in a pool of chocolate and ice cream, this didn’t matter too much).  Serendipity was a delicious and indulgent dinner, but make sure you bring at least two or three friends to share all the courses with if you want to be able to walk afterwords.

PS. Oh, did you think I forgot the drinks?  Come on now.  All of them were pricey but good, and unsurprisingly over-the-top.  I recommend the champagne with elderflower and an edible hibiscus in the bottom.  I think it was called the Fourth Prince. Opulence at it’s finest.

This blueberry mojito came with lots of fruit-accessories. I was skeptical. But it was good.

Delia’s Chocolate Bread and Butter Pudding

23 May

Finished chocolate bread pudding

We had a rare visit from some extended family members this weekend, and took the opportunity to celebrate Father Spice’s birthday a few days early with a big dinner. Unfortunately (for me, that is), he isn’t a huge fan of cake, or most sweets, so the dessert was the trickiest part of the menu to plan. We considered a classic British summer pudding, but currants are difficult to find at the best of times in America, and apparently impossible this early in the season. So we decided to go for the not-quite-seasonal, but certainly delicious, chocolate bread pudding.
This recipe is from Delia Smith, basically the British equivalent of Julia Child. Whenever we’re cooking a big dinner at home, someone immediately suggests consulting “Delia.” As this recipe indicates, her recipes might not always be the healthiest, but she never lets us down.

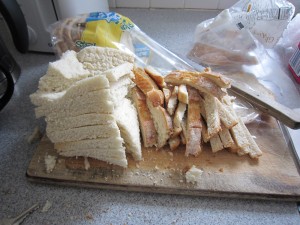
I won't tell if you munch on those crusts

A couple notes on the recipe: I roughly increased it to fit our oval baking dish, about 12 inches lengthwise. I used four eggs (up from Delia’s three), but some of them were quite small and I think it would have been fine with three. The booze flavor does come through quite strongly, so if you’re not using it I would definitely add something like a teaspoon of vanilla. And lastly, this is definitely a make-ahead dish (perfect for dinner parties), as you want a lot of time for the sauce to soak in to the bread.

First layer of bread down

Chocolate Bread and Butter Pudding
Serves 10
Equipment: Double boiler or saucepan with heatproof bowl, ovenproof dish preferably a bit smaller than 9×13
Ingredients:
1 loaf good-quality white sandwich bread, 1 day old
7 oz (200 g) Dark chocolate, 75% cocoa solids
2 1/2 cups (625 ml) heavy cream
6 tbsp dark rum or amaretto
3/4 cup (155 g) super-fine/caster or granulated sugar
1 stick (113 g) butter
Good pinch of cinnamon
3 extra-large eggs
To serve: Chilled heavy cream
Method: Lightly butter your ovenproof dish. Remove the crusts from your slices of bread, and cut each slice into four triangles. Set aside. Place the chocolate, whipping cream, rum, sugar, butter and cinnamon in a double boiler or a bowl tightly fit over a pan of simmering water. Make sure the bowl is not touching the water. Heat, stirring occasionally, until the butter and chocolate have melted and the sugar is dissolved. The mixture will not be homogenous. Remove the bowl from the head and stir well to amalgamate the ingredients better (the chocolate will probably have sunk to the bottom).
In a separate bowl, whisk the eggs. (I poured a little bit of the chocolate mixture into the eggs to temper them because I was worried the next step would cook them, but Delia doesn’t find this necessary.) Pour the chocolate mixture into the eggs and whisk very thoroughly to blend them together.
Pour about a 1/2 inch layer of the chocolate mixture into the base of the dish, and arrange half of the bread over the chocolate in overlapping rows. Next, pour half of the remaining chocolate all over the bread is evenly as possible. Arrange another layer of the bread triangles over the first. You may not use up all the bread. Finish by pouring the rest of the chocolate evenly over the top layer, and then gently press down the bread with a fork so that it is evenly covered in chocolate.

Ready to absorb all that chocolate-y goodness

Cover the dish with clingfilm and allow to cool at room temperature for about 2 hours, then transfer for the fridge to continue soaking for anywhere from 24 to 48 hours (longer is better).
When ready to cook, pre-heat the oven to 350F (180C). Remove the clingfilm and bake on a high shelf for 30-35 minutes. It is done when the top is slightly crunchy, but the inside should still be soft and squidgey. Let cool for ten minutes before serving with cold heavy cream.

Dark Chocolate Sour Cherry Cookies

27 Apr

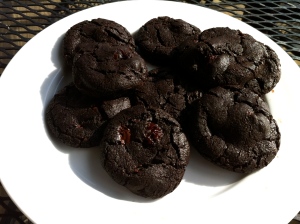
Yummies.

After making mushroom lasagna for my family this weekend, I decided we needed something to balance out the vegetables and so made these cookies, which are loaded with two types of chocolate and delicious sour cherries.  The recipe comes from Martha Stewart Cookies, a book Gina and I were given for Christmas by Gina’s godmother, who is also an avid and excellent baker.  I’ve never been a big Martha Stewart fan (I tend to like less grandmothery chefs who haven’t gone to jail), but this book is pretty awesome.  It has about 100 cookie recipes, divided by type such as “chewy”, “crispy”, “cakey”, etc.  I am told she has a similar cupcake book, although I can’t imagine how there are quite as many cupcake varieties as there are cookie types.

I sometimes forget how easy cookies are to make, but these were really a cinch- just mix some dry ingredients, add an egg and chocolate, put in the oven and enjoy.   We didn’t have a mixer in the mountains, so I even made do with just a spoon to whisk everything together.  They are intensely chocolatey, so certainly not for anyone with a chocolate aversion (is there such a person? I don’t know one), but the sour cherries add a nice contrast that lightens up the chocolate monotony.  Below is a halved recipe from the original, but I assure you, you will still have cookies for days- I’m never sure why cookie recipes assume that you are baking for 20.  Try these sometime soon, I promise you will not regret it.  Just have a large glass of milk nearby.

Dark Chocolate Sour Cherry Cookies
From Martha Stewart Cookies

Makes about 2 dozen

Equipment: Electric mixer (or wooden spoon and some old fashioned elbow grease), knife, cookie sheet

Ingredients:
3/4 plus 2 tablespoons all-purpose flour
1/2 plus 2 tablespoons unsweetened cocoa powder
1 teaspoon baking soda
1/8 teaspoon salt
1 1/4 stick unsalted butter, room temperature
1/2 plus 2 tablespoons granulated sugar
1/4 plus 2 tablespoons packed dark brown sugar (light brown works too)
1 large egg
1/4 teaspoon vanilla extract
6 ounces bittersweet chocolate, coarsely chopped
3/4 cup firmly packed dried sour cherries

Preheat oven to 350 degrees.  Line cookie sheet with parchment paper or grease with butter. In a bowl sift together flour, cocoa powder, baking soda, and salt.  In the bowl of an electric mixer with paddle attachment, or large bowl with wooden spoon, cream together the softened butter and sugars until fluffy and light.  Add egg and vanilla and stir/beat until combined.  Add the flour mixture and stir until just combined.  With a wooden spoon, mix in the chocolate and sour cherries.

Form balls of dough (mine were about 1 rounded tablespoon although Martha recommends 1/4 cup, which seems excessively large).  Place balls on the baking sheets, 2-3 inches apart.  Bake until puffed and cracked, about 9 to 11 minutes.  Let cool and enjoy!

Best Brownies Ever

25 Mar

Chocolate and butter, what more could you ask for?

I was browsing through our posts recently and was shocked to discover how long it’s been since I posted a baked good recipe. I feel like I’m a much better baker than real-food cook, but I guess I’m so busy at college that I don’t have as much time to just make something delicious for myself. (Or I just don’t have time to make something delicious AND post a blog about it. Sorry.) But it was the opening night of the Children’s Theater play I’m in last Friday, and I felt like the cast might need some motivation during our Thursday rehearsal, so I decided to make these brownies.

I love you, Trader Joe

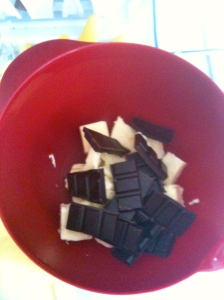
Brownies are one of the baked goods that I rarely buy in stores or bakeries. With the exception of the amazing ones at Baked, I usually find them overly sweet, not chocolate-y enough, and dry. Brownies from mixes are also usually too sweet, and without the chocolate punch. You will not think any of those thoughts about these brownies. They are intensely fudgey and just sweet enough, and if you under-bake them like I did, deliciously gooey. And it’s not just me–  they got pretty rave reviews from the cast (though home-baked goods in a college setting always seem to be met with wonder).I think the key is to beat the eggs in until the mixture is silky and pulling away from the sides of the bowl– this isn’t hard, but it is definitely more than just a regular “stir to combine”.
Three notes: I used Trader Joe’s 70% chocolate labeled as “Imported from Belgium,” which apparently was voted the best dark chocolate by Serious Eats not long ago. It is definitely the cheapest you will find, and available in little three packs and a huge “pound plus” bar, so I highly recommend it.
While I was at Trader Joe’s, I decided to pick up some dried cherries, because I’ve heard they’re awesome in brownies, and that Trader Joe’s has good ones. Unfortunately, I picked up the wrong type– I should have gone with the tart instead of the regular “Bing” cherries, but either way they added a nice textural contrast to the brownies, though not a huge amount of flavor.
Lastly, all the measurements for the recipe I followed were in weights, and I don’t have a scale. This meant a lot of looking up conversions, and a lot of guessing. I’ve put down the approximate amounts I used in cups, but can’t guarantee they are actually faithful to what Jamie intended.

Silky, silky batter. (Taking pictures of final products is hard)

The Best Brownies (Adapted from Jamie Oliver)
Equipment:
Square baking tin, two mixing bowls, saucepan or double boiler, parchment paper
Ingredients:
250 g butter (18 tablespoons, 2 sticks + 2 tbsp)
200 g dark chocolate (70% is best)
75 g dried sour cherries (I used about 1/2 a cup) (optional)
50 g chopped nuts (optional)
360 g superfine or white sugar (1 3/4 cup)
80 g cocoa powder (2/3 cup)
65 g flour (A little over 1/2 a cup)
1 tsp baking power
4 large eggs

Method: Preheat oven to 180C/350F. Line 8×8 baking tin with parchment paper (I did this very roughly with one piece and it came out fine, this is just to make lifting out and cutting the brownies easier). Roughly chop chocolate and butter into pieces and put in a large bowl over simmering water, or in double boiler, or a microwave. Melt, stirring occasionally, until smooth. Roughly chop cherries if desired, and stir them and nuts in if you are using them.
In a separate bowl, mix together sugar, cocoa powder, flour, and baking powder, and add to chocolate mixture. Stir together well. Beat the eggs (in the bowl that used to have the flour in it, if you want), and stir into the chocolate mixture. Keep stirring until the batter is a silky consistency and starting to pull away from the sides.
Pour mix into tin and put in oven for 25 minutes. A toothpick shouldn’t come out clean, or they won’t be fudgey. They should be slightly springy on the outside but still gooey in the middle. Mine were a little undercooked… it’s a little hard to tell when they’re done, so if you definitely don’t like undercooked brownie then perhaps cook a little longer. Allow to cool in tray, then pick up parchment and transfer to plate to cut into squares (this is easier if they have been refrigerated, especially if they are very gooey). Try not to eat them all.

Eating in Andalusia: Desserts and Drinks

18 Mar

One thing I did not eat: The bitter Seville oranges lining the street

Ok, I know it might seem from my last post that I could not possibly have eaten any more during my short week in Spain. But oh, I did. See, my excuse is that it rained almost every day I was there (I know, I was not expecting this either). And it turns out there are very few public spaces in southern Spain that are indoors– people tend to congregate in outdoor plazas, and lots of smaller cafes have only outdoor seating. Even a lot of the tourist attractions were outside. So when we wanted to take refuge from the rain (and couldn’t contemplate another tapas), we were obliged to duck into a bar or bakery for an hour or so.
At least, that’s what I kept telling myself.
We can start with the drinks. There were two drinks on seemingly every menu in Seville: Cruzcampo beer and tinto de verano. Cruzcampo brewery was founded in Seville, which I guess explains its huge popularity there– it is the only or primary beer in a lot of places. I took one sip of Brett’s, and that was enough for me. I’m not a beer-lover, and it tasted pretty much like Budweiser or something to me– not something I would seek out, though I’m sure some people would like it.
Tinto de verano was much more up my ally. This seems to be the south of Spain’s version of sangria (which I hardly ever saw offered). It’s a mix of red wine and a carbonated lemon-y drink, served cold. It’s very refreshing, and I found it a good drink for those times when we really were just sitting somewhere to take a break, and I didn’t want anything strong.

A lady's portion of tinto de verano

The day that it rained the hardest, by the way, happened to be a Wednesday, which is apparently long-awaited all over Spain due to the deal that a chain called “100 Montaditos” (100 little sandwiches) has. On Wednesdays, all of their sandwiches (which are, as the title implies, little) are 1 euro, and if you buy it with a sandwich a big mug of beer or tinto is only 2 euros. The sandwiches are mediocre, but if you’re getting the ones that are normally 2 euros they’re a pretty good deal, and the place was certainly packed all day long.

Two montaditos and a beer: 4 euro

On the stronger side of things, I was informed by Mother Spice that I had to try sherry while I was in Andalusia, as this fortified wine is only made in the region. This proved a little difficult at first, not because places didn’t carry it, but because I had no idea what it was called in Spanish– it turns out it’s “Jerez,” the name of the area where it is produced. The Spaniard I finally got this out of was completely bewildered as to why we English-speakers would change this to “sherry.” In any case, the sherry I tried was much drier than those I’ve had before, and so could be drunk with a meal rather than as a dessert.
It was perhaps not the wisest decision, however, to follow our sherry-tasting with agua de sevilla, but we happened to be going straight from that restaurant to a flamenco show at La Carboneria. This is the venue advertised everywhere as the best for flamenco in Seville, though we actually enjoyed a more amateur show on Calle Betis in Triana even more. Either way, “agua de sevilla” was advertised heavily in La Carboneria, and Brett’s Spanish friend informed us that it was “very local,” and we had to try it. Far from being water, Brett’s report of it being made was “a third champagne, a third pineapple juice, and a third mystery mixture.” A wikipedia search shows that the “mystery mixture” was probably a combination of whiskey and cointreau. In any case, this delicious combination was topped off with whipped cream and cinnamon– and while a whole pitcher may have been slightly ambitious, it was certainly delicious.

Dessert or drink? Agua de sevilla

Thankfully, however, there were some days when our rain-breaks came in the form of baked goods rather than beverages. My favorite of these, hands down, was churros y chocolate. Though fairly common, it took us a little while to find somewhere serving this combination, but it was well worth the wait. The churros in Spain are not covered in cinnamon sugar, but are simply long pieces of fried dough. When ordered “y chocolate,” they come with hot chocolate that is intensely rich and thick and, blissfully, you are encouraged to dip your churro into the chocolate. One would be hard pressed to find a better combination.

Take your churro...

... and give it a dip!

We also tried some other local pastries, many of which were excellent. I unfortunately didn’t catch the name of the honey-soaked flaky pastries in every window, but they were surprisingly good– I thought they would be overly sweet, but they turned out to have a delicate aniseed flavor balancing out the honey. We had intended to search out one of the many convents that apparently sell nun-baked pastries from their windows, but unfortunately in this one mission the rain thwarted us. Brett did find them after I left, however, and snapped a picture of their traditional muffins for me.

Nun-baked muffin= nunfin.

And that, I believe, is the end of my culinary adventure in Spain. I am now back in Washington, and eating lots of vegetables to try to cancel out the effects of my indulgent week. (Let’s all pretend the brownie recipe coming later this week just didn’t happen.)

Eating Our Way Through Brooklyn

23 Feb

The Red Hook waterfront

Mother Spice is off gallivanting in India (supposedly for work, although when we talked to her she seemed to be at a spa on the beach), so Gina and I came to New York for the weekend to keep our long-suffering father company.  The three of us decided to go on an adventure to Brooklyn, spurred by a trip to Brooklyn Gina and Father Spice took over the summer, which led to Father Spice discovering Brooklyn at about the same time The New York Times did (see: this).  Our trip to Brooklyn turned into us eating at no fewer than three places in one afternoon, visiting Williamsburg, Red Hook, Cobble Hill, and driving through multiple other places while Father Spice both a) gave us history lessons (always fun!), and b) went into a 30 minute discussion with himself about why it was a mistake that we didn’t think more seriously about moving there when we first came to NY.

Oops, we ate half of this before remembering the picture

We ended up grabbing lunch at a decent-but-nothing-exciting Thai place in Williamsburg, and then went on to Red Hook, original home of Red Hook Lobster Pound, a spattering of little boutiques among the old industrial buildings, and our destination: Baked.  Baked has been featured both on Serious Eats, for being the Best Cupcake in New York, and on Food Network’s “The Best Thing I Ever Ate”, for their salted chocolate brownie.  So it was pretty inevitable that we would be going there to sample some butter-laden goodies.  We tried the red velvet cupcake with cinnamon frosting, the salted brownie, and a pumpkin chocolate chip pound cake.  All three were delicious, and I can absolutely see why one would go to Brooklyn just to stock up on brownies.  The cupcake was somehow both much moister and much lighter than any other I have tried (and trust me, living in a combination of DC and NY means I eat a lot of cupcakes), and the frosting was amazing and airy without being at all too sweet or cloying.  The salty-sweet combination of the brownie was also sublime, and it had a very rich, gooey, chocolate texture.  The pound cake was ordered as an afterthought by Father Spice, but was (surprise, surprise), also awesome, very moist and cakey with a great flavor combination of the pumpkin and chocolate.

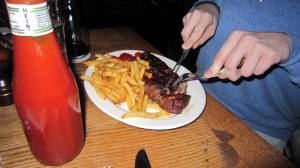
Prime Meats steak frites

After some more history lessons while looking out over the docks in Red Hook and driving around Prospect Park (did you know it was designed by the same person who created Central Park, which was inspired by a park in Liverpool, aka Father Spice’s hometown?), we headed over to the Carrol Gardens area for an early dinner at Prime Meats.  Prime Meats is well known in Brooklyn and was recommended to us by a family friend who seems to have eaten at every “best restaurant” in the city.  They take no reservations, but we got there at about 5:45 and only had to wait 10 minutes before being seated.  The atmosphere is very friendly and relaxed, and there were lots of families there while we were eating.  It was noisy without being overwhelming or annoying, and the brick walls and wood finishing with tealights around the window contributed to the casual feeling.  It was also quite reasonably priced for such a lauded place in New York City- it wasn’t cheap, but was less expensive than we thought it might be.

Brisket with cabbage and juniper berries (whatever they are)

The menu is very simple and only has a few main items on it, including a roast chicken, burger, steak, and brisket.  Gina and I split the duck salad to start, which had pieces of shredded duck as well as some slices of duck breast, with apple and toasted pumpkin seeds.  It was very good, as was Father Spice’s celery salad with a simple but delicious vinaigrette dressing.  For the main courses, I had steak frites, which was a very generous and well cooked steak with great fries, Father had the braised brisket with cabbage and juniper berries, which had come recommended to us and was also delicious, and Gina had the burger, which looked great and was finished by her in approximately two bites.  Seriously, I looked over about a minute after getting our food and it was gone already, so I’m gonna guess it was good.  I would definitely go back here under many circumstances- it would be a fun place to go with family, or with a group of friends for a casual but very tasty dinner.  And it’s within walking distance of the Carrol Gardens subway stop, so if you’re in NY consider taking a trip across the bridge for this, I promise you won’t be disappointed.

Mince Pies

23 Dec

Best Christmas snack ever

Due to the UK’s complete inability to deal with 8 inches of snow, Gina and I, who were scheduled to leave DC on Tuesday, are not leaving until the 23rd and arriving in England on Christmas Eve.  After our first flight was cancelled we were initially told we would not get to England, where our parents (but unfortunately not their luggage), already are, until Christmas day.  Then Father Spice sweet-talked a BA agent and we were placed on flights going through Texas for the 22nd, which were subsequently cancelled yesterday morning (even though the other two flights to London out of Dallas still ran, apparently we just have terrible luck predicting which flights will actually make it out). It’s been a rough few days to say the least- thanks, British Airways.


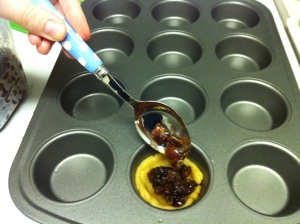
Action shot putting the mince meat in

So after another long, why-do-play-with-my-emotions-British-Airways, type of day last night, Gina and I came home to my apartment (after packing her belongings for 3 weeks and 2 drastically different climates into a carry-on suitcase so our luggage doesn’t get lost, which took quite a bit of “Gina, do you really need that many t-shirts?” coaxing), to find that my roommate Lily had made us all mince pies!  They were seriously good, and cheered both of us up immediately.  For those of you not familiar with mince pies (aka anyone not from England), no “mince meat”, does not contain actual meat, and they are best enjoyed with either red wine, brandy, or warm apple cider.  Mince pies are hard to describe if you’ve never had them, but they have a shortbread-like crust and a pretty strongly flavored, fruity and brandy-y, mince filling.  These are what Santa gets, with his glass of sherry, on Christmas Eve in the Ginger Spice household (Ok, everyone stop freaking out over this, Santa gets enough of this milk and cookies nonsense in the US, he needs some sherry to keep him going all night).  Although they take a while to complete, these are actually not that complicated to make- the mince meat just involves putting all of the ingredients in a pot and letting it simmer, and the crust is very simple.  If you can get your hands on some traditional clotted cream, it goes very well with the mince pies- otherwise brandy butter will do (What’s that! You don’t know what brandy butter is?? Look it up, your life will change). Don’t try to stick exactly to any recipe for the mince meat, just kind of throw various fruits into a pot and as much or as little brandy as you would like until it tastes good to you.  These are great for entertaining around Christmas- just make sure to leave at least one for Santa!


Lily’s Mince Pies

Ingredients

For the Mince Meat
6 apples
1/2 pint apple cider
1 tablespoon brown sugar
1 cup raisins
1/2 cup cranberries
1/2 cup crushed walnuts (or other nut)
1 teaspoon cinnamon
1 teaspoon grated fresh ginger
1 teaspoon nutmeg
Zest and juice of 1 lemon
1/2 cup glace cherries
1/4 cup brandy

For the Crust
1 egg
2 cups of flour
1 cup brown sugar
1 stick butter, melted
1/2 teaspoon vanilla extract
1 tablespoon milk or 1 egg white (for brushing tops)

Peel and dice the apples into small pieces. In a saucepan, dissolve the sugar into the cider, and once dissolved add all other ingredients except the brandy.  Continue stirring while you add all of the ingredients, then when they are all added, cover the pot and simmer for 20-30 minutes, until the apples are soft.  Stir occasionally to prevent burning.  Take off the heat and leave to cool, then add brandy to taste.

While mince meat is cooling, prepare the crust.  Sift flour into large mixing bowl, add sugar, egg, vanilla, and melted butter.  Mix with spoon until the mixture forms a ball (or put in food processor until ball forms). Liberally flour a surface and rolling pin (dough should be very sticky), then place dough onto the floured surface and roll out until quite thin (about 1/8 inch), but not falling apart.

To form mince pies: cut dough into equal numbers small and slightly larger circles using cookie cutters, or the bottom of 1/3 and 1/4 cup measuring cups.  Grease a muffin tray, then place each large circle in one muffin holder, creased so that the dough goes up the edges of the muffin holder to form a cup shape.  Spoon a heaped teaspoon of mincemeat into each dough cup, then cover with smaller circle of dough. Press edges together so sides of dough are touching. Glaze lightly with milk or egg white.  Bake at 350 for 15-20 minutes or until top is golden brown.  Take out and leave to cool, and once cooled sprinkle with confectioners sugar.